
Speeding up the test execution process is on every test engineer s mind when working with a custom Selenium framework. Even more so if you re working on a long term project, and if you are dealing with a tight regression period.
When in need to perform testing on different browsers, versions, and operating systems, the good news is that the solution is already out there.
We just need to set it up and start using it.
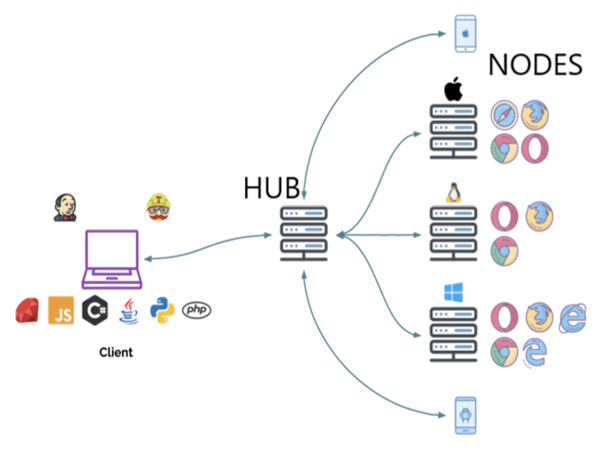
What Is Selenium Grid?
Selenium Grid is a testing tool that allows us to run tests on different machines against different browsers.
It is part of the Selenium Suite, which specializes in running multiple tests across different browsers, operating systems, and machines. You can connect to it with Selenium Remote by specifying the browser, browser version, and operating system you want through Selenium Remote s Capabilities.
Architecture overview

You can use RemoteWebDriver the same way you would use WebDriver locally. The primary difference is that RemoteWebDriver needs to be configured so it can run your tests on a separate machine.
The RemoteWebDriver is composed of two pieces: a client and a server. The client is your WebDriver test and the server is simply a Java servlet, which can be hosted in any modern JEE app server.
The RemoteWebDriver is an implementation class of the WebDriver interface that a test script developer can use to execute their test scripts via the RemoteWebDriver server on a remote machine.
There are two parts to RemoteWebDriver:
1. a server (hub)
2. a client (node)
The RemoteWebDriver server is a component that listens on a port for various requests from a RemoteWebDriver. Once it receives the requests, it forwards them to any of the following: Firefox Driver, IE Driver, or Chrome Driver, whichever is called for.
The language-binding client libraries that serve as a RemoteWebDriver client, as it used to when executing tests locally,translate your test script requests to JSON payload and sends them across to the RemoteWebDriverserver using the JSON wire protocol.
When you execute your tests locally, the WebDriver client libraries talk to your Firefox Driver, IE Driver, or Chrome Driver directly.
Now, when you try to execute your tests remotely, the WebDriver client libraries talk to the RemoteWebDriverserver and the server talks to either the Firefox Driver, IE Driver, or Chrome Driver, depending which one of these the WebDriver client asks for.
Selenium Grid set-up
Now that we understand the Selenium Grid architecture, on to the set-up!
First, download and install JDK on both hub and node(s), then navigate to the Oracle web page to download and install the latest version of Java JDK:

Pick up a machine to serve as a Selenium hub and download a Selenium server from the web page.

Once downloaded, create a folder SeleniumGrid on the C drive and move the downloaded jar file into it.
Repeat the entire process on the node machine (download, create a folder, move).

Add the folder to the environment Path variable:

Create a hubconfig.json file, in the SeleniumGrid folder, with the following configuration settings:
{
  "port": 4444,
  "newSessionWaitTimeout": -1,
  "servlets" : [],
  "withoutServlets": [],
  "custom": {},
  "capabilityMatcher": "org.openqa.grid.internal.utils.DefaultCapabilityMatcher",
  "throwOnCapabilityNotPresent": true,
  "cleanUpCycle": 5000,
  "role": "hub",
  "debug": false,
  "browserTimeout": 0,
  "timeout": 1800
}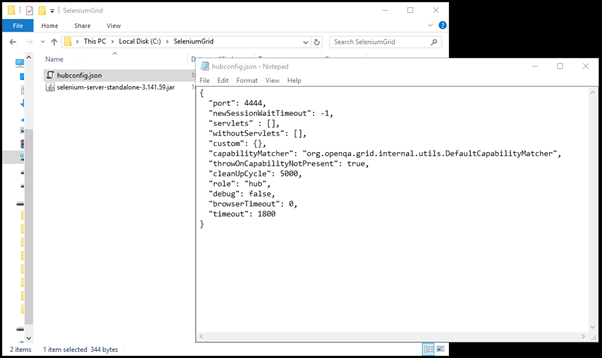
Hub configuration
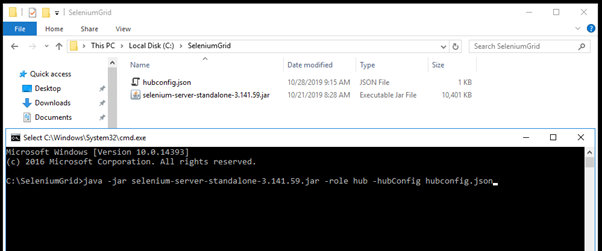
Open the command prompt, navigate to the SeleniumGrid folder and execute the command:
java -jar selenium-server-standalone-3.141.59.jar -role hub hubConfig hubconfig.jsonNote: If you see the message, “ java is not recognized as an internal or external command, operable program or batch file” that means you didn t set JAVA_HOME on the machine. Learn how to setup JAVA_HOME and PATH on these links.
After you press Enter, you should get a message like this one:
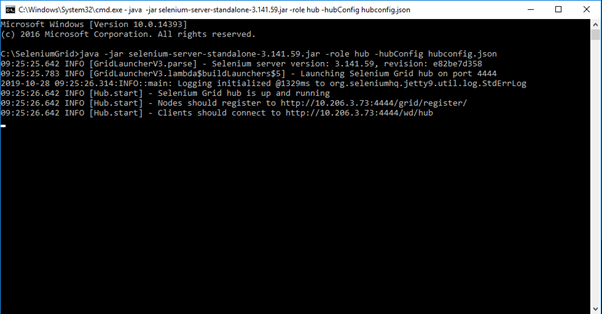
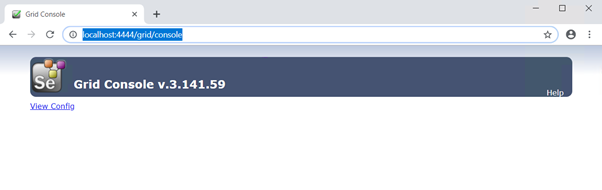
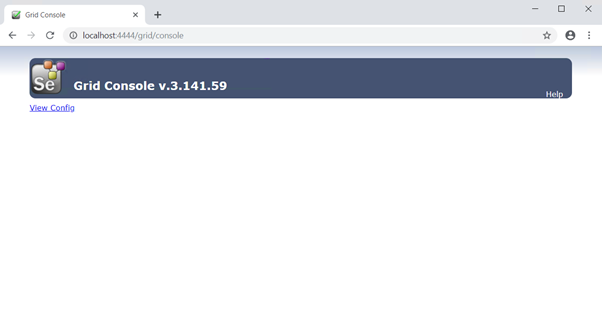
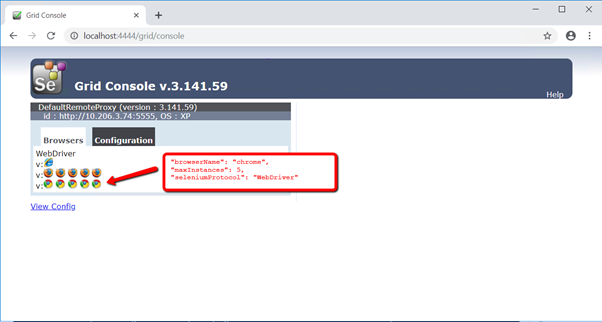
To double-check if the hub is up and running, you can simply type in http://localhost:4444/grid/console in your web browser of choice.
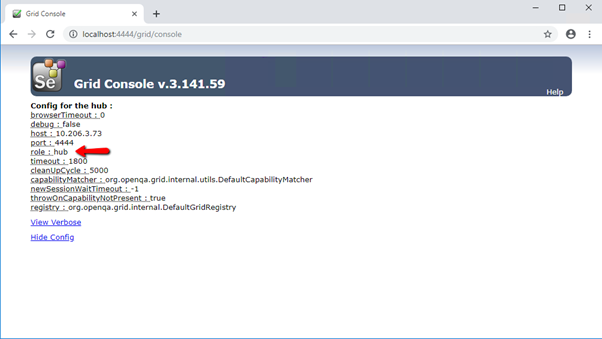
Clicking on the View Config link pulls up a detailed configuration window with data that we succeeded in launching a Selenium hub.
Node(s) configuration
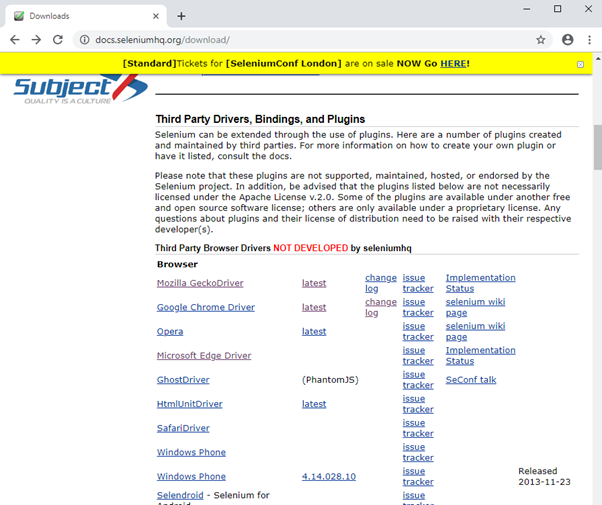
Go to the node machine and add the SeleniumGrid folder to the Path variable. Then, navigate to the https://www.seleniumhq.org/download/ page, download web drivers for Chrome, Firefox, and Edge browsers and store it to the SeleniumGrid folder.
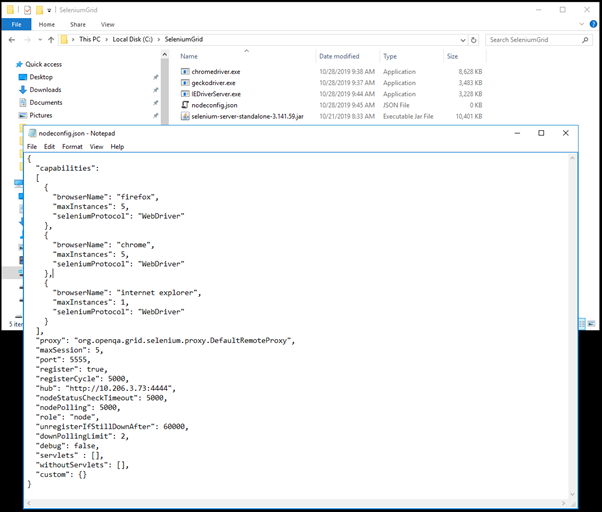
Now, create a new nodecofnig.json file and store it to SeleniumGrid folder.
{
  "capabilities":
  [
    {
      "browserName": "firefox",
      "maxInstances": 5,
      "seleniumProtocol": "WebDriver"
    },
    {
      "browserName": "chrome",
      "maxInstances": 5,
      "seleniumProtocol": "WebDriver"
    },
    {
      "browserName": "internet explorer",
      "maxInstances": 1,
      "seleniumProtocol": "WebDriver"
    }
  ],
  "proxy": "org.openqa.grid.selenium.proxy.DefaultRemoteProxy",
  "maxSession": 5,
  "port": 5555,
  "register": true,
  "registerCycle": 5000,
  "hub": "http://PUT_YOUR_HOST_IP_HERE:4444",
  "nodeStatusCheckTimeout": 5000,
  "nodePolling": 5000,
  "role": "node",
  "unregisterIfStillDownAfter": 60000,
  "downPollingLimit": 2,
  "debug": false,
  "servlets" : [],
  "withoutServlets": [],
  "custom": {}
}
Note: Replace PUT_YOUR_HOST_IP_HERE with hub IP address.
Open the command prompt on a node machine and navigate to SeleniumGrid folder and execute the command:
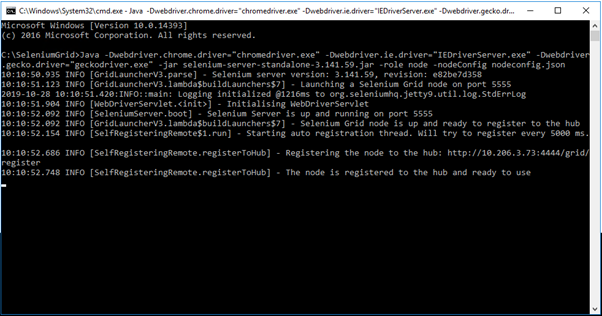
Java -Dwebdriver.chrome.driver="chromedriver.exe" -Dwebdriver.ie.driver="IEDriverServer.exe" -Dwebdriver.gecko.driver="geckodriver.exe" -jar selenium-server-standalone-3.141.59.jar -role node -nodeConfig nodeconfig.json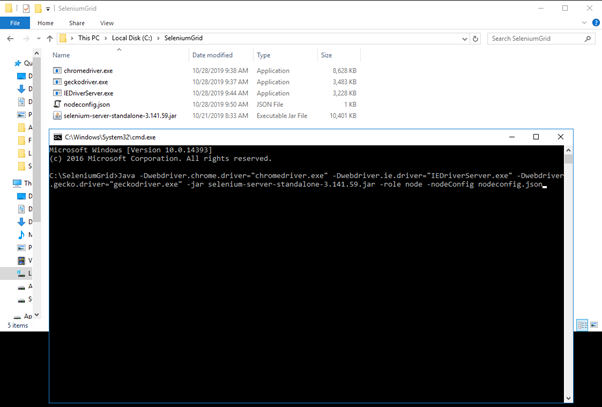
After a few seconds, you will see the “The node is registered to the hub and ready to use” message in the console.
Now, go back to the hub machine and refresh the http://localhost:4444/grid/console address.
The node is registered and we can see all the needed details.
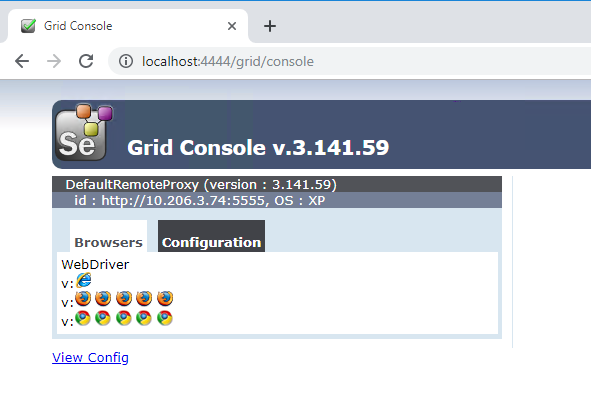
Below the DefaultRemoteProxy title, we can see the node ID. It tells us that the node, with address 10.206.3.74, is communicating with the hub through the port number 5555 (this is a value set in the node configuration .json file).
You can repeat the process and add more nodes if needed.
Creating a simple selenium test that can run on a Selenium Grid
Now the real fun begins.
We can consider the hub and nodes as our automation testing environment, and I am going to use my host machine as a test development environment.
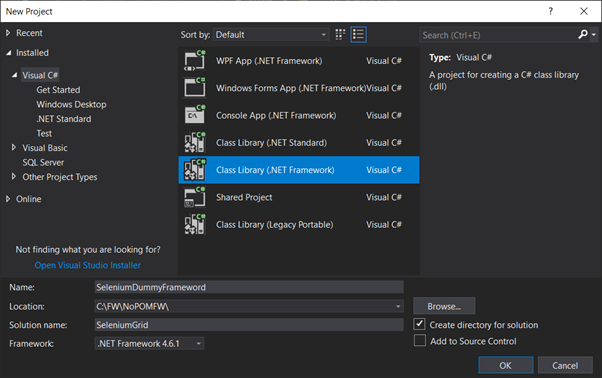
Open up Visual Studio and create a Class Library project.
Use NuGet Package Manager to add necessary packages to the project:
- Selenium.WebDriver
- Selenium.Support
- Selenium.WebDriver.ChromeDriver
- Selenium.Firefox.WebDriver
- Selenium.WebDriver.MicrosoftDriver
- NUnit
- NUnit3TestAdapter
Rename the existing Class1.cs to TestWithSeleniumGrid.cs and update class definition as follows:
using NUnit.Framework;
using OpenQA.Selenium;
using OpenQA.Selenium.Chrome;
using OpenQA.Selenium.Firefox;
using OpenQA.Selenium.IE;
using OpenQA.Selenium.Remote;
using System;
namespace SeleniumDummyFrameword
{
    public class TestWithSeleniumGrid
    {
        IWebDriver driver;
        string hubUrl;
[SetUp]
        public void StartBrowser()
        {
            hubUrl = "http://10.206.3.73:4444/wd/hub";
TimeSpan timeSpan = new TimeSpan(0, 3, 0);
ChromeOptions chromeOptions = new ChromeOptions();
driver = new RemoteWebDriver(
                new Uri(hubUrl),
                chromeOptions.ToCapabilities(),
                timeSpan
                );
        }
[Test]
        public void OpenGoogleAndSearch()
        {
            driver.Navigate().GoToUrl("https://www.google.com");
            driver.Manage().Window.Maximize();
            driver.FindElement(By.Name("q")).SendKeys("I Want to se this on a remote machine");
        }
[TearDown]
        public void CloseBrowser()
        {
            driver.Dispose();
        }
}
}
Note: For demo purposes, I am not following any POM best practices.
Pull up the Test Explorer window and run the test.
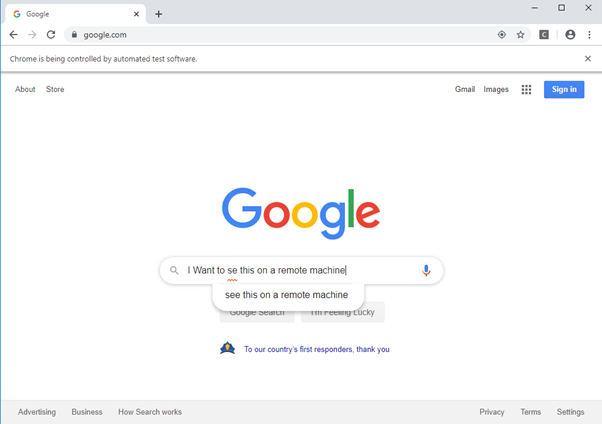
Woohooo! The test passed!

To try it out on other browsers (Internet Explorer and Firefox), just update the StartBrowser() method with necessary browser options:
FirefoxOptions firefoxOptions = new FirefoxOptions();
driver = new RemoteWebDriver(
 new Uri(hubUrl),
 firefoxOptions.ToCapabilities(),
 timeSpan
 );
Or:
InternetExplorerOptions IEOptions = new InternetExplorerOptions();
IEOptions.AddAdditionalCapability("ignoreProtectedModeSettings", true);
IEOptions.AddAdditionalCapability("EnsureCleanSession", true);
driver = new RemoteWebDriver(
 new Uri(hubUrl),
 IEOptions.ToCapabilities(),
 timeSpan
 );
Selenium Grid High Availability?
We made great progress so far, but there are a few more things to tackle.
With the current configuration, if something goes wrong on the hub or node(s) server(s) and it restarts (server updates applied, a system administrator maintenance work or similar), our Selenium grid will not auto start. In that case, we would need to connect to all the servers in the Selenium Grid server farm and start one by one.
Note: If a hub goes down, the nodes connected to it will attempt to re-register themselves to a hub at the same location (host/port). Bringing back a hub online at the same location will bring the nodes back on too.
Start node as a service
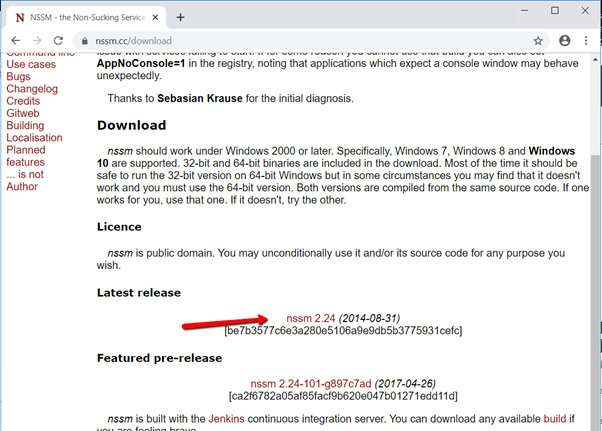
Navigate to the https://nssm.cc/download web page and download the latest stable version of nssm software:
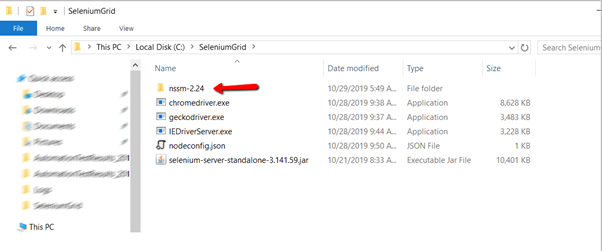
Extract it to the SeleniumGrid folder and add the nssm.exe as a path environment variable:

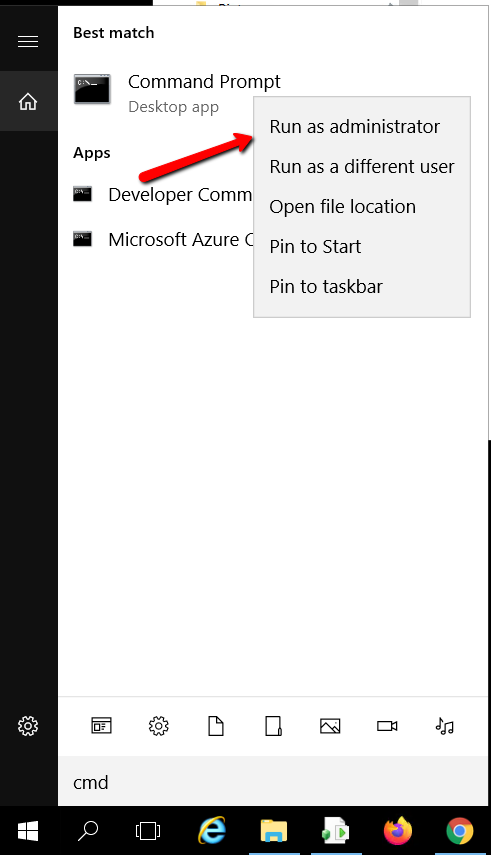
Open up the Command prompt as an administrator and run the command in a way:
nssm.exe install seleniumnode SELENIUM_NODE_STARTUP_COMMANDOn my machine, this is what it looks like:
nssm.exe install seleniumnode Java -Dwebdriver.chrome.driver="chromedriver.exe" -Dwebdriver.ie.driver="IEDriverServer.exe" -Dwebdriver.gecko.driver="geckodriver.exe" -jar selenium-server-standalone-3.141.59.jar -role node -nodeConfig nodeconfig.json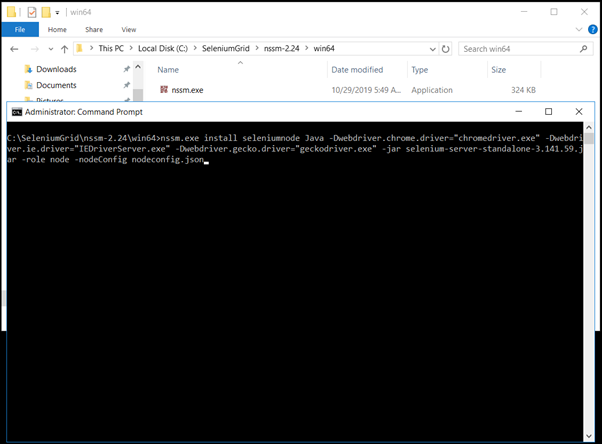
After you press enter, you should see this message:

Now restart the node and bring up the Services after it boots up:
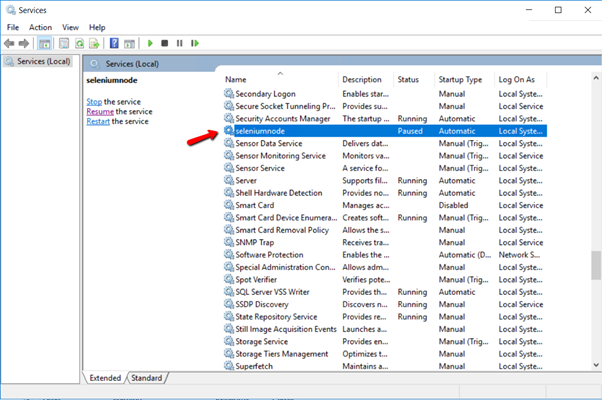
There it is! Now just right-click on it and start it, if it hasn t started already!
Note: If you cannot start the service, as it is on my end. And getting Paused state, open up registry editor (type in regedit) in run and update the AppDirecory parameter to C:\SeleniumGrid at the location:
HKEY_LOCAL_MACHINE\SYSTEM\CurrentControlSet\Services\seleniumnode\Parameters


Note: You can always cancel the service with a simple cmd command:
nssm remove seleniumnode confirmSelenium Node fail-over test
Restart the node, and let us monitor Selenium Grid console on the hub.
After a few seconds upon restart, the node will be lost and the console will look like this:
Keep on refreshing the console and the node will auto-register after few minutes:

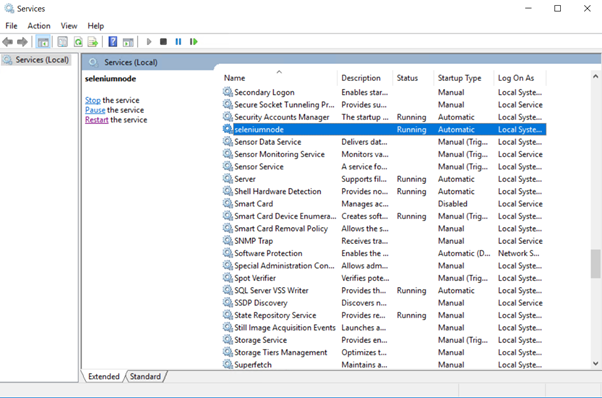
On the node machine, the service is up and running!
You can now repeat the process for other nodes, if any, and hub.
Note: Make sure to provide hub grid settings in nssm command!
Multitasking ninja – Parallel test run
So far, we configured a node and a hub. That is enough for a simple parallel test execution.
Inside our node configuration we set maximum chrome instances to five.
Let s try to run two tests in parallel.
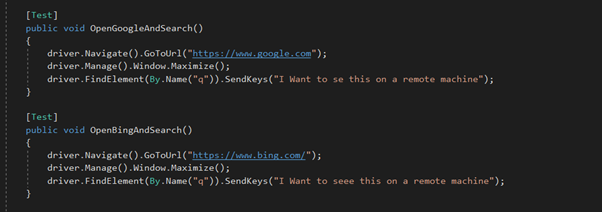
Add a new test within the existing TestWithSeleniumGrid.cs class.
[Test]
public void OpenBingAndSearch()
{
 driver.Navigate().GoToUrl("https://www.bing.com/");
 driver.Manage().Window.Maximize();
 driver.FindElement(By.Name("q")).SendKeys("I Want to seee this on a remote machine");
}
The test will search for “I Want to see this on a remote machine” with Bing searching engine:
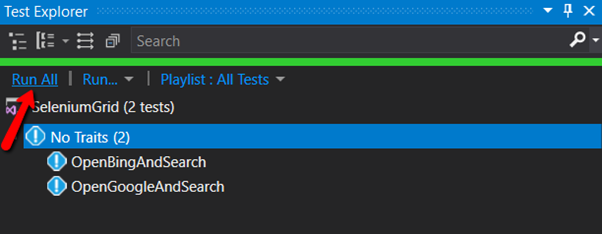
Build the solution and run all the tests:
Examine, it did not run it in parallel:
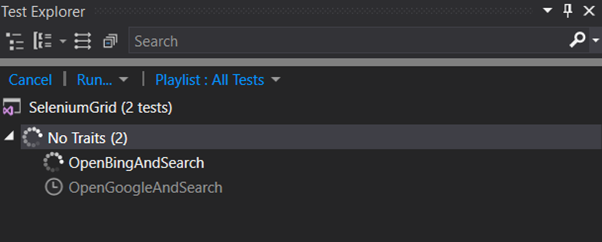
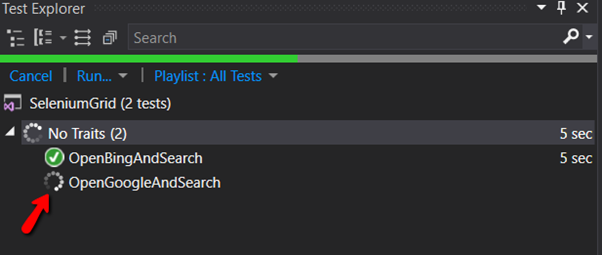
It firstly runs OpenBingAndSearch and then OpenGoogleAndSearch
In order to fix the issue, simply add the [Parallelizable] attribute before test definition. Your tests should now look like this:
using NUnit.Framework;
using OpenQA.Selenium;
using OpenQA.Selenium.Chrome;
using OpenQA.Selenium.Firefox;
using OpenQA.Selenium.IE;
using OpenQA.Selenium.Remote;
using System;
namespace SeleniumDummyFrameword
{
public class TestWithSeleniumGrid
{
IWebDriver driver;
string hubUrl;
[SetUp]
public void StartBrowser()
{
hubUrl = "http://10.206.3.73:4444/wd/hub";
TimeSpan timeSpan = new TimeSpan(0, 3, 0);
ChromeOptions chromeOptions = new ChromeOptions();
driver = new RemoteWebDriver(
new Uri(hubUrl),
chromeOptions.ToCapabilities(),
timeSpan
);
#region Other browsers
//FirefoxOptions firefoxOptions = new FirefoxOptions();
//driver = new RemoteWebDriver(
// new Uri(hubUrl),
// firefoxOptions.ToCapabilities(),
// timeSpan
// );
//InternetExplorerOptions IEOptions = new InternetExplorerOptions();
//IEOptions.AddAdditionalCapability("ignoreProtectedModeSettings", true);
//IEOptions.AddAdditionalCapability("EnsureCleanSession", true);
//driver = new RemoteWebDriver(
// new Uri(hubUrl),
// IEOptions.ToCapabilities(),
// timeSpan
// );
#endregion
}
[Test]
[Parallelizable]
public void OpenGoogleAndSearch()
{
driver.Navigate().GoToUrl("https://www.google.com");
driver.Manage().Window.Maximize();
driver.FindElement(By.Name("q")).SendKeys("I Want to se this on a remote machine");
}
[Test]
[Parallelizable]
public void OpenBingAndSearch()
{
driver.Navigate().GoToUrl("https://www.bing.com/");
driver.Manage().Window.Maximize();
driver.FindElement(By.Name("q")).SendKeys("I Want to seee this on a remote machine");
}
[TearDown]
public void CloseBrowser()
{
driver.Dispose();
}
}
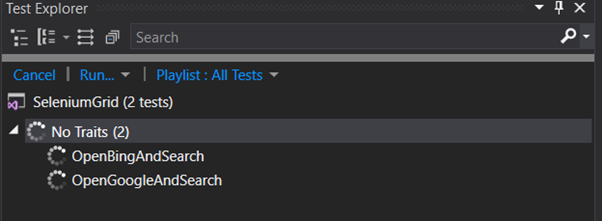
}Build the solution and run the tests by clicking on Run All link in Test Explorer.
Aaaaanddd. Success!
After reading this blog, you should be able to successfully configure a simple Selenium Grid architecture. Now it s time play around with it and add more nodes, make node configuration to run tests against just one browser type or similar. The sky is the limit.
Till the next time, happy testing!
Great article. Highly informative, thanks. May you advise how the same can be achieved when the Hub is hosted as an EC2 instance on Amazon and the node is on another network? I’ve failed to get this work.