
Most of us will agree that working with JS testing frameworks is fun. Within several days or even hours, you can utilize several libraries, get the work done and impress your teammates and management. While creating automated tests at full speed, most of us do not care about formatting issues, possible dead code or runtime issues. Luckily, there is a guy that can do that work for you and prevent headaches ESLint.
Linting is a process that reduces errors and improves the overall quality of your code. Using lint tools can help you accelerate development and reduce costs by finding errors earlier. In other words, it is simply a static code analysis tool used to flag programming errors, bugs, stylistic errors, and suspicious constructs.
Linting vs Debugging
Debugging is something you do manually after a bug is found. Linting can prevent debugging by catching bugs before you manually run your program, by running the code and checking for errors.
Installation
For the purposes of this blog, we will use ESLint for JavaScript.
Prerequisites:
- Visual Studio Code
- Node
- Simple JS automation testing framework.
Open the Visual Studio Code and open a sample project. Navigate to extensions, search for “eslint” and install it.

Now add ESLlint to your project as a dev-dependency package.
Go to terminal, navigate to the project root and execute the command below.
npm install --save-dev eslint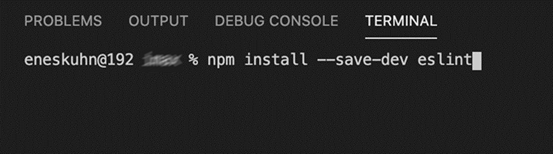
Note: in case you see the blocked ESLINT message in the lower right part of your screen, click on it and Allow Everywhere ESLint package.

After it is added to the project, we need to initialize it. Type in the command below.
eslint --init
Note: in case you see the error message “zsh: command not found: eslint” simply run the above command in the correct folder: ./node_modules/.bin/eslint init
The command will trigger the wizard. Follow the nine steps and configure ESLint for your project:
step 1:

step 2:
For the second step: refer to any class in your test framework (mine is JavaScript and uses import keyword). Open any page class and see references.


step 3:

step 4:

step 5:

step 6:

step 7:
At this point, we have an option to choose between three styles (I prefer the Airbnb style). You can find more information about all the styles on the links below:
- https://github.com/airbnb/javascript#types
- https://standardjs.com/rules.html
- https://google.github.io/styleguide/jsguide.html

step 8:

step 9 (finally):

Reality Check
After installation, you ll see a bubble on the right of the PROBLEMS tab. It shows us a number of linting issues in our code. Click on the Problems tab and verify the issues.
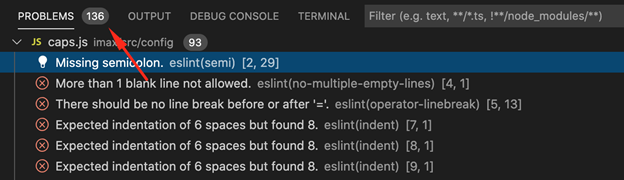
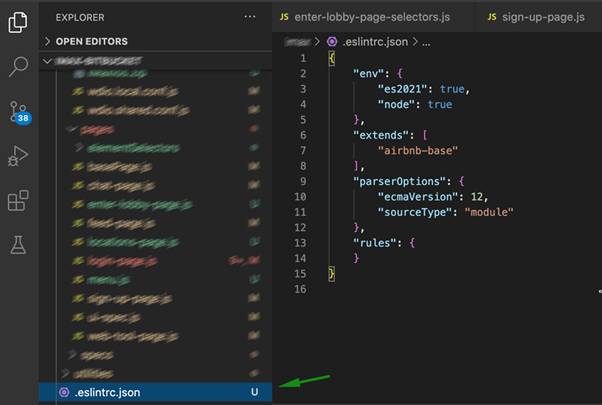
You ll notice that a new config file was created in the project. This configuration can be modified per our preferences.
Run It From the Terminal
Add the script to package.json:
"eslint": "eslint ./"
Go to the terminal and execute the command below.
npm run eslintVerify the results. In my example, things look pretty bad.
Ô£û 2891 problems (2825 errors, 66 warnings)
2315 errors and 0 warnings potentially fixable with the ` fix` option.
How can it be? Almost 3000 errors on such a small project? Not sure if I have 3000 lines of the code in the first place. Something is wrong here! Let us take a closer look at what we did. We executed eslint on everything. Our node_modules are part of everything as well. Some modules are following different style guides or maybe do not follow our style guide. We should fix our config and make eslint look only at our code.
ESLint ignore
Go to terminal and execute the command below.
touch .eslintignoreOpen the newly created file and add node_modules as ignore!

Run the npm run eslint command again and verify the results! Looks better, right?
Now, open your project and verify the issues. You can reveal possible fix options for an issue by clicking on it.
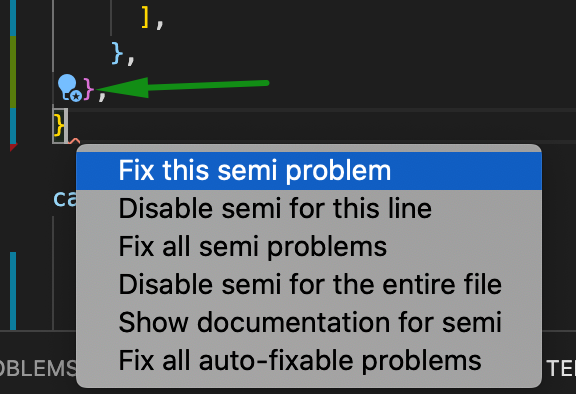
You can easily check issue by issue and find the best solution for it. Fix all auto-fixable problems options will help you a lot.
This is the final step in the process, which brings us to the end of this blog; I hope you found it useful. Until next time, happy testing!