
A system steadily growing in popularity
Apache Kafka is a genuinely likable name in the software industry; decision-makers in large organizations appreciate how easy handling big data becomes, while developers love it for its operational simplicity.
What is Apache Kafka exactly? It is a powerful publish-subscribe messaging system that not only ensures speed, scalability, and durability but also stores and processes streams of records. Its unique design allows us to send and listen to messages in real-time.
Apache Kafka uses 5 components to process messages:
- Topic contains records or a collection of messages.
- Producer publishes messages to a topic or topics.
- Consumer subscribes to topics, reads, and processes messages from the topics. It is basically a listener.
- Broker manages the storage of messages in the topics. If there is more than one broker, it is called Cluster.
- ZooKeeper tracks the status of cluster nodes, topics, partitions, etc. Good to know: ZooKeeper is required for running the Kafka right now, but it will be replaced with a Self-Managed Metadata Quorum in the future.
Today, we will create a Kafka project to publish messages and fetch them in real-time in Spring Boot. Let s go!
Installing Kafka and ZooKeeper
Kafka uses ZooKeeper, an open-source technology that maintains configuration information and provides group services. That being said, we will need to install both in order to create this project.
First, we need to download the source folder of Kafka from here.
Step 1: Download Kafka
First, download the source folder here. Once you download the Kafka, un-tar it. Simply open a command-line interpreter such as Terminal or cmd, go to the directory where kafka_2.12-2.5.0.tgz is downloaded and run the following lines one by one without %.
% tar-xzf kafka_2.12-2.5.0.tgz % cdkafka_2.12-2.5.0
Step 2: Starting The Server
As I ve already mentioned, the Kafka uses ZooKeeper. The good news is that you do not need to download it separately (but you can do it if you want to). We will use the convenience script packaged as a ZooKeeper server that comes with the Kafka.
Once you are in the directory of the Kafka folder, kafka_2.12-2.5.0, run the following command to start a single-node ZooKeeper instance. bin/zookeeper-server-start.sh config/zookeeper.properties
Since Kafka console scripts are different for Unix-based and Windows platforms, on Windows platforms use bin\windows\instead of bin, and change the script extension to .bat.
If the ZooKeeper instance runs without any error, it is time to start the Kafka server. Simply open a new tab on your command-line interpreter and run the following command to start the Kafka server. bin/kafka-server-start.sh config/server.properties. Windows users should again use bin\windows\ directory to run the server.
If the Kafka server runs without any error as well, we are ready to create a Spring Boot project.
Creating A Spring Boot Project
We are going to create a Spring Boot application with Spring Web and Spring for Apache Kafka dependencies and use Spring Initializr to generate our project quickly.
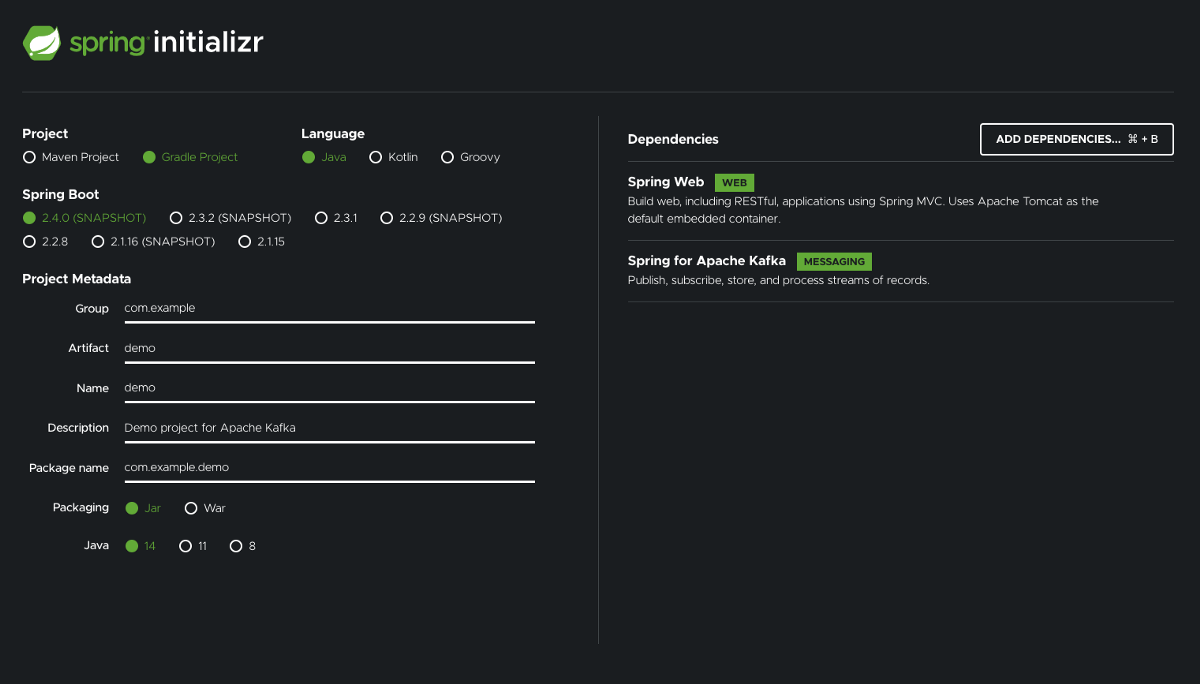
When creating the project, make sure to
- choose Java in the Language section, and
- add Spring Web and Spring for Apache Kafka dependencies.
The rest is up to your preference.
Getting Started
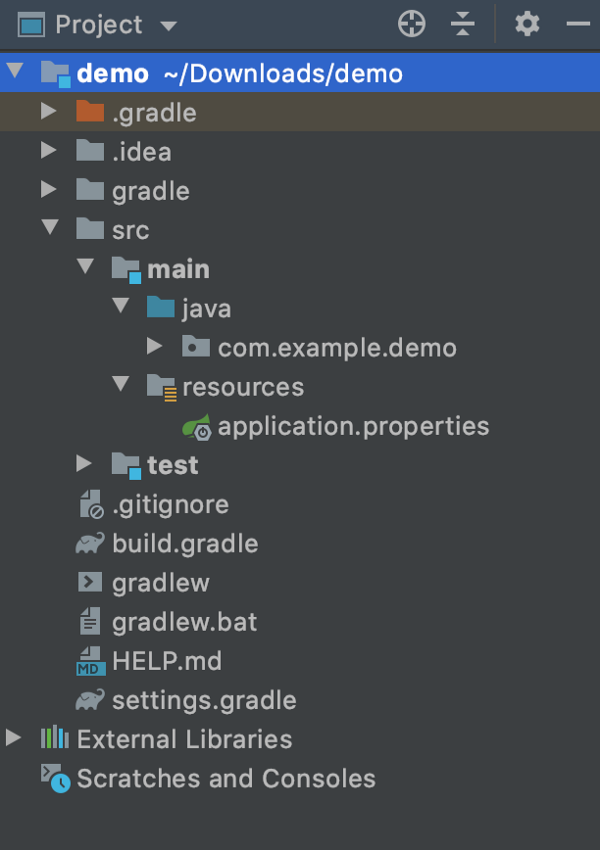
In this example, I am going to use IntelliJ IDEA to run the Gradle Spring Boot project.
Once you generate the project and import it to the IDE you choose, the project structure will be as shown in the picture. Please note that it may look a little bit different if you choose Maven instead of Gradle when generating the project.
Last but not least, we will write all our implementations in src > main > java > com.example.demo package.
Configuration
First things first; configuration. There are two ways to configure our Producer and Consumer.
Option 1: Using application.properties or application.yml
application.properties:
spring.kafka.consumer.bootstrap-servers = localhost:9092
spring.kafka.consumer.group-id= group_id
spring.kafka.consumer.auto-offset-reset = earliest
spring.kafka.consumer.key-deserializer= org.apache.kafka.common.serialization.StringDeserializer
spring.kafka.consumer.value-deserializer = org.apache.kafka.common.serialization.StringDeserializer

spring.kafka.producer.bootstrap-servers = localhost:9092
spring.kafka.producer.key-serializer = org.apache.kafka.common.serialization.StringSerializer
spring.kafka.producer.value-serializer = org.apache.kafka.common.serialization.StringSerializer
application.yml:
spring:
  kafka:
    consumer:
      bootstrap-servers: localhost:9092
      group-id: group_id
      auto-offset-reset: earliest
      key-deserializer: org.apache.kafka.common.serialization.StringDeserializer
      value-deserializer: org.apache.kafka.common.serialization.StringDeserializer

    producer:
      bootstrap-servers: localhost:9092
      key-serializer: org.apache.kafka.common.serialization.StringSerializer
      value-serializer: org.apache.kafka.common.serialization.StringSerializer
bootstrap-servers requires a comma-delimited list of host:port pairs to use for establishing the initial connections to the Kafka cluster. You can add multiple Kafka nodes with a comma such as localhost:9092,localhost:9095.
group-id requires a unique string that identifies the consumer group to which this consumer belongs.
auto-offset-reset determines what to do when there is no initial offset in Kafka or if the current offset no longer exists on the server.
key-deserializer requires a deserializer class for keys.
value-deserializer requires a deserializer class for values.
Option 2: Java class with @Configuration
We first need to create a Java class for configuration. Simply right-click com.example.demoand create a new package. I named itconfiguration, but you can give it any name you fancy.
Once the package is created, we need to create the java class. Right-click configurationpackage and create a Java class, then name it KafkaConfiguration. Again, you can give any name you want for this one as well.
KafkaConfiguration.java
package com.example.demo.configuration;

import org.apache.kafka.clients.consumer.ConsumerConfig;
import org.apache.kafka.clients.producer.ProducerConfig;
import org.apache.kafka.common.serialization.StringDeserializer;
import org.apache.kafka.common.serialization.StringSerializer;
import org.springframework.context.annotation.Bean;
import org.springframework.context.annotation.Configuration;
import org.springframework.kafka.config.ConcurrentKafkaListenerContainerFactory;
import org.springframework.kafka.core.ConsumerFactory;
import org.springframework.kafka.core.DefaultKafkaConsumerFactory;
import org.springframework.kafka.core.DefaultKafkaProducerFactory;
import org.springframework.kafka.core.KafkaTemplate;
import org.springframework.kafka.core.ProducerFactory;

import java.util.HashMap;
import java.util.Map;

@Configuration
public class KafkaConfiguration {
    @Bean
    public ProducerFactory<String, String> producerFactoryString() {
        Map<String, Object> configProps = new HashMap<>();

        configProps.put(ProducerConfig.BOOTSTRAP_SERVERS_CONFIG, "localhost:9092");
        configProps.put(ProducerConfig.KEY_SERIALIZER_CLASS_CONFIG, StringSerializer.class);
        configProps.put(ProducerConfig.VALUE_SERIALIZER_CLASS_CONFIG, StringSerializer.class);

        return new DefaultKafkaProducerFactory<>(configProps);
    }

    @Bean
    public KafkaTemplate<String, String> kafkaTemplateString() {
        return new KafkaTemplate<>(producerFactoryString());
    }

    @Bean
    public ConsumerFactory<String, String> consumerFactory() {
        Map<String, Object> configProps = new HashMap<>();
        configProps.put(ConsumerConfig.BOOTSTRAP_SERVERS_CONFIG, "localhost:9092");
        configProps.put(ConsumerConfig.GROUP_ID_CONFIG, "group_id");
        configProps.put(ConsumerConfig.KEY_DESERIALIZER_CLASS_CONFIG, StringDeserializer.class);
        configProps.put(ConsumerConfig.VALUE_DESERIALIZER_CLASS_CONFIG, StringDeserializer.class);

        return new DefaultKafkaConsumerFactory<>(configProps);
    }

    @Bean
    public ConcurrentKafkaListenerContainerFactory<String, String> kafkaListenerContainerFactory() {
        ConcurrentKafkaListenerContainerFactory<String, String> factory = new ConcurrentKafkaListenerContainerFactory<>();
        factory.setConsumerFactory(consumerFactory());

        return factory;
    }
}
And with that, we are done with configuration.
I prefer Option 2 when working on bigger projects, considering the properties file may be huge and it might be hard to find what you re looking for. Having a Java class for a specific third-party library, which is Kafka in our case, helps me find the configuration for it easily.
Services
We need to create services for both Producer and Consumer to send and receive a message.
First, we need to create a package under com.example.demo and name it service(you can still name it anything you want) Then we will create two service classes. You can create only one service for both Producer and Consumer.
ProducerService.java
import org.slf4j.Logger;
import org.slf4j.LoggerFactory;
import org.springframework.kafka.core.KafkaTemplate;
import org.springframework.kafka.support.SendResult;
import org.springframework.stereotype.Service;
import org.springframework.util.concurrent.ListenableFuture;
import org.springframework.util.concurrent.ListenableFutureCallback;

@Service
public final class ProducerService {
    private static final Logger logger = LoggerFactory.getLogger(ProducerService.class);

    private final KafkaTemplate<String, String> kafkaTemplate;
    private final String TOPIC = "kafkaTopic";

    public ProducerService(KafkaTemplate<String, String> kafkaTemplate) {
        this.kafkaTemplate = kafkaTemplate;
    }
public void sendMessage(String message) {
logger.info(String.format("$$$$ => Producing message: %s", message));

ListenableFuture<SendResult<String, String>> future = this.kafkaTemplate.send(TOPIC, message);
future.addCallback(new ListenableFutureCallback<>() {
@Override
public void onFailure(Throwable ex) {
logger.info("Unable to send message=[ {} ] due to : {}", message, ex.getMessage());
}

@Override
public void onSuccess(SendResult<String, String> result) {
logger.info("Sent message=[ {} ] with offset=[ {} ]", message, result.getRecordMetadata().offset());
}
});
}
}
If you really want to get the result of the sent message, we can block the thread by using ListenableFutureand the thread will wait for the result.
It is good if you need the result, but this implementation will slow down the process. It is not recommended to block the producer, because the Kafka is known as a fast stream processing platform.
If you do not want to get the result, you can simply remove everything under logger.info(String.format(“$$$$ => Producing message: %s”, message)); and keep this.kafkaTemplate.send(TOPIC, message); only.
ConsumerService.java
import org.slf4j.Logger;
import org.slf4j.LoggerFactory;
import org.springframework.kafka.annotation.KafkaListener;
import org.springframework.stereotype.Service;

@Service
public final class ConsumerService {
    private static final Logger logger = LoggerFactory.getLogger(ConsumerService.class);

    @KafkaListener(topics = "kafkaTopic", groupId = "group_id")
    public void consume(String message) {
        logger.info(String.format("$$$$ => Consumed message: %s", message));
    }
}
Controller
As we are done with services, we now need to create a controller class to create an endpoint.
First, we need to create a new package and name it controller (the name rule still applies). Then create a Java class with a name KafkaController.
KafkaController.java
We are going to create an endpoint, /kafka/publish, which will be a POST method and accept amessage parameter to publish the message.
package com.example.demo.controller;

import com.example.demo.service.ProducerService;
import org.springframework.web.bind.annotation.PostMapping;
import org.springframework.web.bind.annotation.RequestMapping;
import org.springframework.web.bind.annotation.RequestParam;
import org.springframework.web.bind.annotation.RestController;

@RestController
@RequestMapping("/kafka")
public final class KafkaController {
    private final ProducerService producerService;

    public KafkaController(ProducerService producerService) {
        this.producerService = producerService;
    }

    @PostMapping(value = "/publish")
    public void sendMessageToKafkaTopic(@RequestParam String message) {
        producerService.sendMessage(message);
    }
}
We can now run the application and call the endpoint.
If you would like to use Postman, you need to create a POST method with the following endpoint. http://localhost:9000/kafka/publish?message=I am publishing a message!

This will trigger our application and send the message to the Kafka.
Or you may use curl command curl -X POST http://localhost:9000/kafka/publish -d message='I am publishing a message!'.
Once you call the endpoint, you will see logs on your project:
c.example.demo.service.ProducerService : $$$$ => Producing message: I am publishing a message! will show up from ProducerService.java.
If you used ListenableFuture, you will also see the following message if the call is successful. c.example.demo.service.ProducerService : Sent message=[ I am publishing a message! ] with offset=[ 0 ].
Since our project both sends and receives messages, we will see a log from ConsumerService.java which fetches the sent message:c.example.demo.service.ConsumerService : $$$$ => Consumed message: I am publishing a message!.
Kafka Tool
Kafka tool is a GUI application for managing Kafka clusters. You can download it from here.
Once it is downloaded, we first need to create a cluster as shown below.
After adding the cluster, we will be able to see our broker, topic and consumer because we already ran our Spring Boot application and it created them.
Click kafkaTopic in theTopics folder and go to theProperties tab. We need to set types ofKey and Message as String as shown below if we want to see the values in string format.
Don t forget to click theUpdate button after you set the types. Now we can go to theData tab to see the messages that we sent.
Conclusion
I m glad to see you ve come all the way to the end. I hope this story made it easier to learn how to create a Spring Boot application to use Apache Kafka and view messages with Kafka Tool.
You may take a look at https://github.com/alicanba-maestral/kafka-medium if you would like to see the whole project.