Introduction: The dreadful CMS trade-off
Modern web is all about great performance. If you ve been in this industry for a little while, you ll have likely heard about how much it matters – especially the initial page load performance. There are studies out there that relate important business metrics like customer conversion rate (or, alternatively, bounce rate) with how long it takes your website to start showing actual content. If you have a personal website, you can easily start measuring this for yourself, using any decent web analytics tool.
Of course, the point about page load time is moot if you don t have content that visitors are interested in consuming. In case you do have content to show to the world, you re likely using some form of a Content Management System (CMS). The problem is, no matter which CMS you use there is a fundamental trade-off between flexibility and performance: the easier it is to manage the content, the harder it is to get it to load fast.
“… no matter which CMS you use, there is a fundamental trade-off between flexibility and performance: the easier it is to manage the content, the harder it is to get it to load fast.”
However, recent software development advancements made it possible to achieve excellent page load performance, while still maintaining a decent level of flexibility in how you manage your content. This article is about those advancements.
By the end of this article you will:
- Learn a little bit about delivering websites over a Content Delivery Network (CDN)
- Gain an understanding of JAMStack, Uniform and “headless” content management systems
Why a CDN?
A CDN is essentially just a network of servers distributed across many data centers around the world, like in Figure 1 here.

As its name suggests, the purpose of a CDN is to deliver web content. If adequately leveraged, a CDN can greatly reduce the time it takes to load a website. In order to understand why a CDN can be useful, let’s talk about the main limiting factors for page load performance.
We can essentially break it down into three separate problems:
- Server-side latency
- Network-induced latency
- Page “heaviness”
Page heaviness is just the amount of “stuff” you put into your page. It s the number and the size of all the images, videos, fonts, JavaScript code, CSS code, etc. If your website is a kitchen sink of every nifty widget you ever thought would be cool to include, no amount of CDN tricks or asset optimization will help – it s always going to load slow.
However, if you already optimized the website content and took great care not to make it bloated, then a CDN can help you with the other two issues. So let s explore that for a bit. Imagine you have a website deployed to a server somewhere in the US, like it s shown in Figure 2.

The specific deployment details are not important for now. What s important is that users can open their browser, enter the website URL, and see the website content – preferably in less than a second-or-two.
Network Latency
Let’s say you decide to test the average load times for your website. There are fancy ways to do that, which can produce extremely detailed results – a quick Google search will introduce you to more than enough options. A simple one is to use a tool like https://www.webpagetest.org/, which is able to load your website from multiple places around the globe and it will tell you how fast it loaded.
What you re more than likely to find is that your website loads fast enough when accessed from the US, but not so much from, say, Europe. It s tempting to think that that s because of the geographical distance, but it s actually more complicated than that. In fact, if you had a direct fiber optic connection between a server in the US and a client in Europe, the network latency experienced by that client would be quite low. After all, light does travel very fast. But of course, that s not how the internet works.
You can t really have a direct connection to each of your clients. Instead, the network packets get routed through many different subnets, appliances, middleboxes, and what-have-you, as they travel across the internet. They are subject to things like network congestion, quality of service issues, and also not all clients have fast fiber optic internet connections. All of those factors combined amount to what we call network latency.
Luckily, there are ways to work around it. As a general rule of thumb, in order to reduce network latency you ll want to decrease the number of “hops” that the network packets need to make while they travel between your clients and your server. This is usually done by placing your server closer to your clients – not in a geographical sense, but in a number-of-network-hops sense.
As a general rule of thumb, in order to reduce network latency you ll want to decrease the number of “hops” that the network packets need to make while they travel between your clients and your server.
So you think to yourself: “OK, I ll just add one more server in Europe and that will decrease network latency for those clients”. And you re not wrong. If you do it correctly, a setup like one shown in the Figure 3 will, in fact, reduce network latency for European clients:

However, this approach is a bit naive because it introduces some not-so-simple questions about things you didn t have to worry about before, when you only had one server:
- How do you keep the databases between these two servers in sync?
- How do you route clients to an appropriate server?
- How do you deploy new website versions to more than one target?
- Etc.
Not to mention that the world is bigger than just US and Europe, so what do you do about the rest of the world? Do you just keep adding servers? At what point does it all become too expensive or just too much to manage?
It s not like those are unsolvable problems, if you try hard enough. But using a CDN is much easier, and will usually give better results anyway. The only downside is that it will work only for a subset of your website: the so-called “static assets”.
Broadly speaking, a static asset is anything that doesn t need to be computed on the server at runtime (e.g. constructed from data stored in a database). So basically: images, audio, video, fonts, icon sets, CSS, JS, and in some cases even HTML. CDNs are great at distributing copies of such assets to their own servers, where they are much closer to your end users, which is illustrated in Figure 4.
Because a CDN will, for the most part, only deal with static assets, it doesn t need to worry about any database replication questions. As for the other two questions (routing and deployments) – they solve those the hard way, so that you don t have to worry about them.
A simple CDN like this doesn t completely solve your website latency problem in case you do still have non-static assets to serve – but it does get you quite far and, depending on your needs, might be enough.

Server Latency
The second problem where a CDN might be helpful, is all the latency caused by your own server. The server receives a request, does some processing to construct a response, and then sends back that response. That processing step is what drives the server-side latency. It can sometimes be quite significant. That usually happens when the processing step involves reading data from a database, or some other type of IO.
If you ve already taken reasonable steps to optimize the server-side request handlers, created appropriate database indexes, introduced a caching layer where appropriate, etc – and your server still takes a long time to process requests – then it might be a good time to consider caching dynamic content on a CDN, alongside the static content we discussed earlier.
The easiest way to achieve CDN caching for dynamic content is to pick a CDN that works in a so-called reverse proxy mode. Note that not all of them do. In fact, most old-school CDNs work by serving static content from a subdomain, while your own server is serving dynamic content from your main domain. In contrast to that, a reverse proxy CDN (like e.g. CloudFlare) will act as a middleman (i.e. a proxy) between your client and the server. All content, both static and dynamic, produced by your server will first go through a CDN edge-node before it reaches the client – and it s thanks to this that a reverse-proxy-mode CDN is able to cache dynamic content, speeding up your page load performance along the way.
All content, both static and dynamic, produced by your server will first go through a CDN edge-node before it reaches the client – and it s thanks to this that a reverse-proxy-mode CDN is able to cache dynamic content, speeding up your page load performance along the way.
Do note that there are some drawbacks to using a reverse-proxy-mode CDN. It may or may not be acceptable for your use case to let all of your network traffic (including sensitive user data) be visible and readable by a CDN. And no, using HTTPS won t protect you from that because the reverse proxy edge-node will actually maintain two separate network connections: one with your server, and the other with your client s browser – so it s basically decrypting HTTPS traffic you signed with your own certificate, and then encrypting it again with their own TLS certificate before it goes out to the client.
The other issue with such CDNs is that they will usually require you to use their own nameservers and transfer all of your DNS records there, which sometimes is a no-go.
Both of these issues are solvable, but they either require extra effort or cost more.
Introducing JAMStack & Headless CMS
Now that we ve taken that long detour into the workings of a CDN let s finally talk about how this relates to Content Management Systems.
Traditionally, a CMS like, say, WordPress will “render” the HTML for your website dynamically, on a server. It will use a layout template and combine it with content stored in a database in order to produce the final output which it sends back to the browser. This is a very flexible approach, but because the base HTML content is now considered dynamic it does come with the performance hits we talked about earlier, and limits your options in terms of content delivery.
An alternative approach would be to not rely on a CMS to actually render the HTML website. This is what s called a “headless CMS”. It boils down to CMS providing the actual content in a JSON format, through something like a RESTful API, or even a GraphQL server. You still get to manage your content through a nice admin interface, but you need to find a different way to construct the user-facing frontend for your website.
When using a headless CMS, you have a couple of options available for how you construct your website frontend, as outlined below in Figure 5.
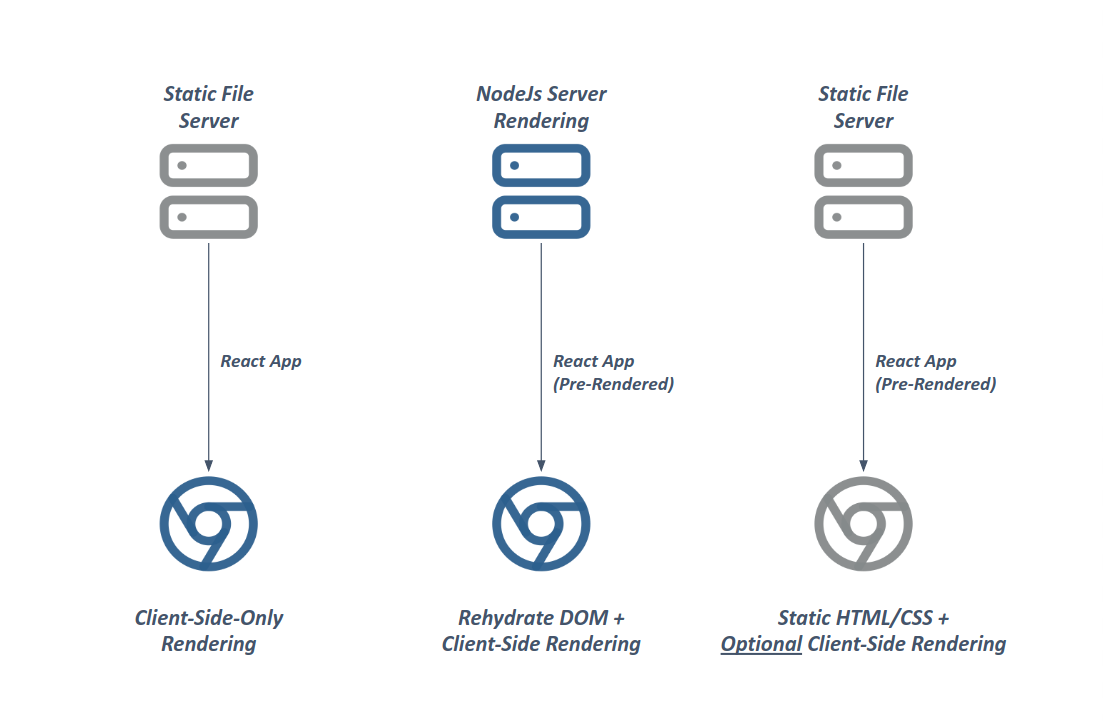
Your options are:
- Use a client-side JavaScript framework (e.g. React) and render all HTML client-side
- Use a client-side JavaScript framework, but combine it with a NodeJs server that can pre-render HTML for the initial page load
- Pre-render and export all HTML (and other assets) to static files ahead of time
Option #1 is the simplest, but unfortunately the time you save not rendering on the server is offset by the time you lose waiting for the JavaScript code to load and produce HTML on the client side. Therefore, not much is gained.
Option #2 is just server side rendering, but with extra steps. It s hard to see exactly how this would be faster than a classic CMS that renders HTML in-process. There might be other (very) good reasons to adopt this approach, but performance is not one of them.
This leaves us with option #3, which some people are now referring to as “JAMStack”, which stands for JavaScript, APIs, and Markup. The gist of it is that you use pretty much the same tech as for option #2 (i.e. you need a NodeJs server) – but you render all of your content ahead of time and export it as static HTML files (plus other assets). If you paid attention to what we talked about in the CDN section earlier, you ll see where this is going. When it comes to page load performance, it doesn t get much better than serving static HTML, CSS, etc, directly from a CDN.
When it comes to page load performance, it doesn t get much better than serving static HTML, CSS, etc, directly from a CDN
“OK, great, so what s the catch, then?” – you may ask. Well, the way we see it, there are two important (but manageable) downsides:
- It s a bit harder to implement the frontend in this manner
- Each content update in the CMS requires you to rebuild & re-export the whole frontend, and push the new version to the CDN you re using
The second issue is relatively easy to overcome with a half-decent CI/CD setup. It s a one-time effort to set it up, and works well as long as your content is not changing very often (e.g. you re not running a front page of a news site).
Regarding the first issue, though, things can get a little bit weird. Writing frontend code that s executed at compile time instead of run time forces you to rethink how you structure and implement your frontend code, and puts quite a few constraints on what you can and cannot do. Luckily there are many people out there who are interested in developing websites this way, so the open source community has come up with multiple frameworks which we can all use. Notable mentions are NextJs (and its VueJs counterpart, NuxtJs), Gatsby, Hugo – and there are tons more out there.
There s also one more tool in this space, called Uniform. It s not a static site generator in itself, nor is it a CMS. What Uniform does is, it lets you combine existing SSGs like NextJs with existing CMS systems like Contentful or Sitecore, and a number of different CDNs. It s the glue that binds all these different software systems together into one coherent – and blazingly fast – content management solution.
We recently leveraged Uniform boilerplate on one such project, and the experience has been quite positive. We were able to get off the ground extremely fast thanks to, in no small part, the thoughtfulness and effort that the Uniform devs put into this tool. The rest of this article will recount that experience and is written by my dear colleague, Fadil, who wrote much of the code for this project.
Sitecore, Sitecore JSS, and Uniform
Now that you have an understanding of what JAM Stack, server-side rendering, and headless CMS are and why they re growing in popularity, we re ready for some full-tech talk;
I will share my experience of using Sitecore as Headless CMS and combining Static Content Export with Content Management Systems.
In case you haven t previously come across Sitecore, it is an integrated CMS platform powered by .NET and an E-commerce solution, providing organizations with tools to create personalized digital experiences.
Like with any other CMS, you need editable and configurable components to build a website. To keep up with the constant evolution of technology, your approach needs to evolve too. React, Angular and Vue are so dominant in the front-end world that at some point Sitecore decided to adjust to the trends and take advantage of those front-end technologies.
This leads us to the next premise:
Sitecore has a powerful marketing platform for delivering digital content. React/Vue/Angular have a proven way of creating components. Combine the two and you get Sitecore JavaScript Services (JSS). Sitecore JSS is a complete software development kit (SDK) for JavaScript developers that enables you to build full-fledged solutions using Sitecore and modern JavaScript UI libraries and frameworks.
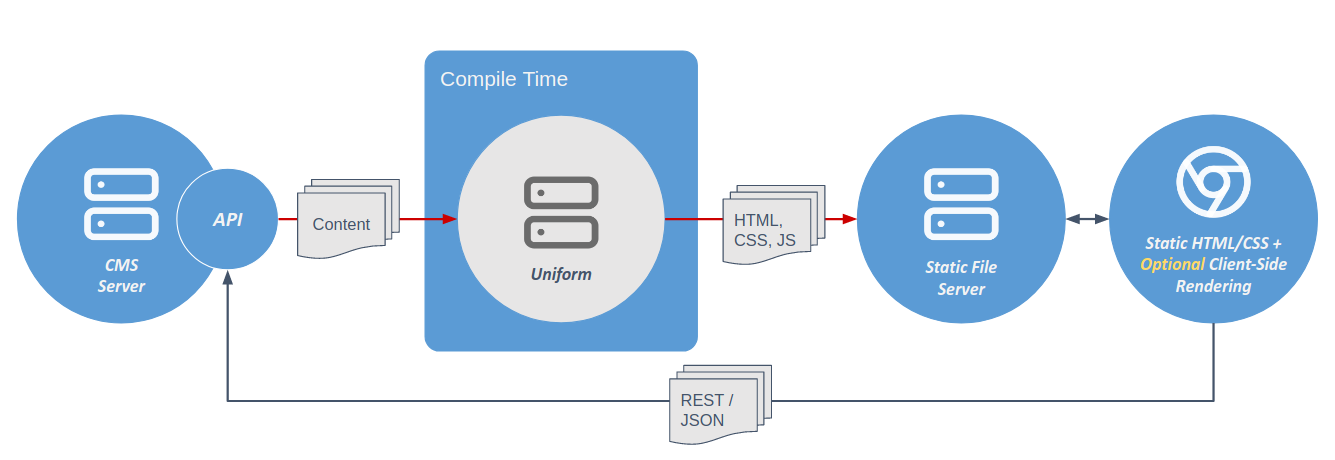
We used the Uniform Starter Kit, including a sample JSS app with the content to go with it, to enable JAMStack architecture. This allowed us to statically generate the whole site at build-time and deploy it to the platform we want.
Another benefit of using Uniform was unlocking origin-less tracking and personalization. Marketing teams assign personalization in Sitecore the usual way but the execution is transferred to the edge server (depending on the CDN of choice) or client-side without paying the cost of going back to the origin content delivery server. This way, we are unlocking the benefits of performance and scale of Content Delivery Networks with personalized experiences.
Developer Experience
As we have a heavy React background, the first thing we wanted to do was create some basic components to see how things work. Please note that going to the source folder and creating a new React component will not be enough if you want to have it visible on your route.
The initial challenge was to understand how Sitecore definitions work and how they re connected with the Sitecore routes.
Looking back on this challenge now that we re almost done with the project, here are the most important highlights you need to get familiar with before you start working with Sitecore JSS:
- Defining components to be visible in Sitecore (difference between fields, params, placeholders)
- Creating routes
- Placeholders
- Common Field Types
- Route layout definition (you can choose between JSON or YAML)
- Components vs Templates
- Importing components by ID in route layout definition
Note: Now, more than ever, you need to think about component reusability and how the components fit in layouts where you have no control over their position (left/right/top/bottom). Is the component responsive? Does the margin fit with adjacent components? Can this component be used independently on different routes? These are questions you need to have answers to, probably in the design phase already. Unquestionably, you ll need to have the answers before you start creating the component. Otherwise, you re setting yourself up for a lot of refactoring later on, in connected mode.
Starting in Disconnected mode
In this mode, you can develop the front-end without the Sitecore back-end by using Sitecore JSS Code-first workflow. Why was this way of working beneficial to us?
After the Discovery Phase, Sitecore front-end developers started working before the Sitecore backend team. If we decided to go with Sitecore-first workflow (connected mode), then the Sitecore front-end team would have to wait three or four weeks until the back-end setup is done. Needless to say how expensive this wasted time is.
If there is already a Sitecore instance, then Sitecore-first workflow is a recommended way of doing things.
A potential downside of disconnected mode is that all Sitecore JSS services must be mocked. Imagine you ve never worked with Sitecore, don t know what data will look like but you need to mock that data. What can you do?
In this situation, it is very important to have prompt and clear communication between both teams. These are the steps we took to mitigate the later errors in connected mode:
- Continuous everyday communication with the Sitecore back-end team on field names and component configuration, so that our mocked data is pretty much the same as the one the Sitecore API will send us in connected mode
- Thorough inspection of sample app content which is generated when you create JSS React Sample App from the official documentation. Honestly, this helped us so much. Because there are samples of component and route definition, what mock data should look like and most importantly when you run the app you get documentation on Common Field Types. So you have everything in one place.
Example of a component in disconnected mode
Component definition – Sitecore part
import { Manifest, CommonFieldTypes } from '@sitecore-jss/sitecore-jss-manifest';

/**
 * Adds the ExampleComponent to the disconnected manifest.
 * This function is invoked by convention (*.sitecore.js) when `jss manifest` is run.
 * @param {Manifest} manifest Manifest instance to add components to
 */
export default function(manifest) {
  manifest.addComponent({
    name: 'ExampleComponent',
    displayName: 'ExampleComponent',
    placeholders: ['left-content', 'right-content'],
    params: ['backgroundColor', 'buttonStyle'],
    fields: [
      { name: 'CTALabel', type: CommonFieldTypes.SingleLineText },
      { name: 'CTAValue', type: CommonFieldTypes.GeneralLink },
      { name: 'items', type: 'multilist', source: 'query:./*' },
    ],
  });

  manifest.addTemplate({
    name: 'Item',
    fields: [
      { name: 'itemImage', type: CommonFieldTypes.Image },
      { name: 'itemDescription', type: CommonFieldTypes.SingleLineText },
    ],
  });
}
Component definition – React part
import React from 'react';
import { Text, Image, Link } from '@sitecore-jss/sitecore-jss-react';

const ExampleComponent = ({ fields }) => {
  // Always check if fields exists
  if (!fields) {
    return null;
  }

  return (
    <>
      <Link field={fields.CTAValue} />
      {fields.items.map((item, index) => (
        <div key={index}>
          <Image field={item.fields.itemImage} />
          <Text field={item.fields.description} />
          <br />
        </div>
      ))}
    </>
  );
};

export default ExampleComponent;
Route layout definition
id: home-page
name: Home

# Define the page layout starting at the root placeholder - in this case, 'main-content'
# root placeholder names are defined in the package.json config section (required for Sitecore deployment)
placeholders:
  main-content:
    - componentName: ExampleComponent
      params:
        backgroundColor: secondary
        buttonStyle: primary
      fields:
        CTALabel: Navigate to some route
        CTAValue:
          href: '/new-route'
          text: 'Navigate to some route (text parameter in General Link)'
        items:
          - name: item-one
            template: Item
            fields:
              itemImage:
                src: ""
              itemDescription: Item One
          - name: item-two
            template: Item
            fields:
              itemImage:
                src: ""
              itemDescription: Item Two
          - name: item-three
            template: Item
            fields:
              itemImage:
                src: ""
              itemDescription: Item Three
In connected mode the route layout definition comes from the Sitecore API instead of the mocked yaml file. The response structure of the API is based on the component definition created in disconnected mode. If you want to change component definition you will now do it in Sitecore instance, but be aware that the React part of the component must be updated too, to read the new data. Below is the example of response for Home page which consists of context and route objects. Inside route object is our root placeholder main-content where all component data should be displayed.
{
  "sitecore": {
    "context": {
      "pageEditing": false,
      "site": {

      },
      "pageState": "normal",
      "language": "en"
    },
    "route": {
      "name": "Home",
      "displayName": "Home",
      "fields": {

      },
      "databaseName": "master",
      "deviceId": "",
      "itemId": "",
      "itemLanguage": "en",
      "itemVersion": 1,
      "layoutId": "",
      "templateId": "",
      "templateName": "",
      "placeholders": {
        "main-content": [

        ],

      }
    }
  }
}
Conclusion – understanding what your client needs
“How will Sitecore handle this?”
This is a question that will always be hanging over your head, no matter what you do in disconnected mode.
We re not gonna lie: switching from the React way thinking to the Sitecore way is hard in the beginning, especially if you don t have a clear understanding of how Sitecore works. Asking yourself “How much control will Sitecore users have?” and “How much control does the user need?” will help you a lot in adapting to a new way of thinking.
Basic control is to change the content, but if you want theme configuration and component styling then it is very important to have uniform design.


When you look at the components on the pictures above, there are two possible conclusions:
- Those are the same components
- Those are different components
Which one is correct? Well, it depends. Either can be true! You need to go back to our questions: “How much control do you want to give to the Sitecore user?”, “Do they need that much control?”
If you take the first option, you will have to give the user the possibility to choose between button variant (contained or not), image type (square or rounded), and highlight (show or hide).
For the second conclusion to be true, you will have to create two different components without configuration options, because you will need to register both of them for Sitecore. In this case, the best option is to communicate this with the designer and agree on a uniform design. For example, a contained button with a square image and highlight which can be hidden.
Possibilities are out there for you to explore and use, but it all boils down to this: you need to define answers that fit the product requirements.