
Deno?? Have I just misspelled Node? Yes and No. (No-De / De-No)
It was created by Ryan Dahl, the expert that stands behind the NodeJS, hence the name game-play.
As a big JavaScript fan (especially NodeJS) – the 14th of May was a very special and exciting day for me. Deno v1.0, a new runtime for executing TypeScript and JavaScript outside the browser, was released!
Deno s main purpose is to overcome all design flaws related to the NodeJS ecosystem. Those flaws were explained in Ryan s presentation held on 6th June 2018 during the JSConf “10 Things I Regret About Node.js”.
Deno was written in Rust and built on top of the Tokio platform, but it executes JavaScript using the powerful V8 engine, the same as NodeJS.
For more information regarding the Deno s ecosystem, you can check its official site.
Before we start with the Deno RestAPI development, let’s mention some of the main characteristics of this new runtime:
- Security Deno is secure by default; it doesn t have permission to perform file system read/write operations, to access a network, to run a subprocessor, or to access environment variables. For each of those, you need to specifically state a list of permissions needed for your code execution.
- Typescript As soon as you successfully install Deno on your machine, you are able to use TypeScript out of the box without creating and managing any configuration file since Deno has its own tsconfig.json
- Modules library Deno provides a standard library which is a set of commonly used modules, created and maintained by Deno developers and guaranteed to work. There is also a third-party library with popular modules (a place from which we will get Oak, deno_mongo, and djwt for our app)
Installing Deno
Deno is a single executable with no dependencies. You can install it by downloading a release binary or by executing install commands:
- macOs (using homebrew)
brew install deno- Linux (using Shell)
curl -fsSL https://deno.land/x/install/install.sh | sh- Windows (using PowerShell)
iwr https://deno.land/x/install/install.ps1 -useb | iexAs soon as you install it, you can start using it. To run a simple code test, open your terminal and run:
deno run https://deno.land/std/examples/welcome.tsThe output should be:

Simple RestAPI
If you come from the NodeJS world, the first thing you usually do when creating a new app is to run an npm init command and follow the process of creating a package.json file.
But with Deno, things are different. There is no package.json, no npm, and no node modules. Just open your favorite IDE (I am using VS Code), navigate to your project folder and create an app.ts file (it will be our project s main file).
The first thing we want to set up in the app.ts is our http server to be able to handle http requests that we plan to develop later on. For this purpose, we will use Oak as our middleware framework for the http server. Probably you never heard of Oak but don t worry, it is the same as Koa.js (popular web app framework for NodeJS).
To be more clear, Oak is just a version of Koa.js customized for Deno, so most of the Koa.js documentation also applies to Oak. For module import, Deno uses official ECMAScript module standards, and modules are referenced using a URL or a file path and includes a mandatory file extension.
Our app.ts should like this:

You will probably get an error that TypeScrip does not allow extensions in the module path. To resolve this issue, download and enable Deno s VS Code extension (enable it only for Deno projects).
In our app.ts we imported Oak s Application object that contains an array of middleware functions. We will use it to setup the http server, and to later bind a router, global error handler, and auth middleware.
In NodeJS, this Application represents the app we import from the express npm package. The Oak module has been imported from the Deno s Third-Party Modules. Beside that, we defined an Application instance, host, port, and we set our server to listen to localhost:4000 address.
As you can notice, Deno allows usage of top-level await, meaning that we do not need to wrap await call inside of the async function on the module level. One big plus for Deno! If you run the app.ts file now, using the command deno run app.ts you will get an error:

As mentioned before, Deno does not have permission to access the network so we need to explicitly emphasize it: deno run allow-net app.ts . Now, the app will successfully compile and run, and we have our server up and running.
In your browser, navigate to localhost:4000 and you should get “Hello World” displayed.
After the initial server setup, we can move on to creating and configuring MongoDB instance for our service. Before you proceed with the db configuration, please make sure you have MongoDB installed, and local service running.
Deno provides (unstable for now) module for MongoDB and we will get it from the Third Party Module. Since the module is in continuous development, the module versions will be changing fast.
Create a new config folder and add two new files in it: db.ts and config.ts that will be used for the project s config variables. The db.ts content should now be as follows (code will be explained afterward):

We imported the init method and MongoClient from the deno mongo module. The init function is used to initialize the plugin. The other part with the code is pretty straight forward; we have defined DB class with two methods, one for connecting to local db service, other as a getter to return database name. At the end, we created a new instance of our database and export it for usage in other project s modules.
For now, we will not run our new code, so the deno_mongo module is currently unavailable in our app. With the next execution of deno run command, all modules will be downloaded and cached locally so any further code execution will not require any downloads, and the app will compile much faster. This is how Deno handles modules.
Since we finished the database setup, we can move on with the controller methods. We will make this very simple by implementing CRUD operations for the Employee model. At the end, we will create an auth middleware to protect create, update, and delete requests. For the project simplicity, we will skip the part of creating singup/signin methods but instead make a simple login that will accept any username and password to generate a JWT (json web token). So, let s go.
Create a new employeeCtrl.ts file. We will first implement a getEmployees method that will return an array of employees with all corresponding properties: id, name, age, and salary. Our controller should look like this:

Since we are using TypeScript, we imported Context (from the Oak module) to define the type of our response object and later on our request object. We also took our db name and defined employees collection. After the interface signature, the get method is implemented. It will fetch all data from the employees collection and return data together with the response status. If the collection is empty, a message will be set as a part of the response body. To test our method, we need to define a route.
Create new file called router.ts:
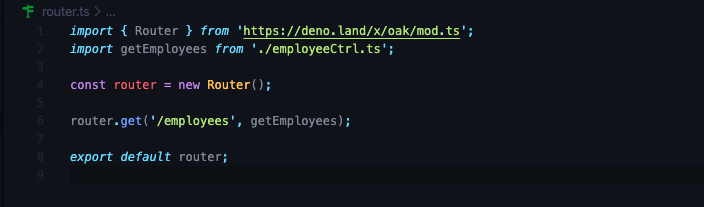
Router implementation is the same as the one using express in NodeJS: Import Router from the corresponding (in our case Oak) module and bind the controller method to the defined route. The last thing to do before testing our route and method is to set our app to use the router. Navigate to app.ts file and update its content as follows:

To make the code more readable, we will introduce config.ts file from this point to store all configuration/env variables. It should be saved in the config folder:
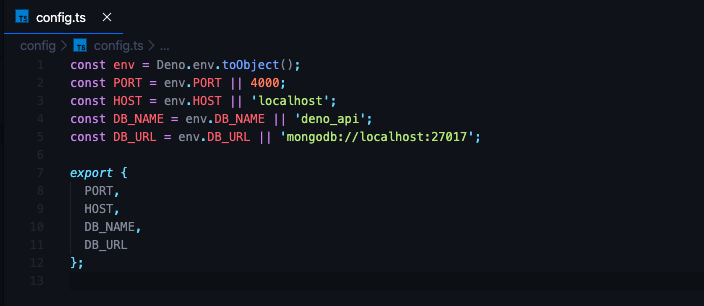
The power of TypeScript and Deno allows us to have access to all types in runtime, and to write strongly typed code.
To run the app execute the following command:
deno run --allow-net --allow-write --allow-read --allow-plugin --allow-env --unstable app.tsRegarding the permissions we need to run our app, we have set a few of them:
- allow-write and allow-read: allow Deno to have access to the disk, in our case to the local database service
- allow-plugin: allow Deno to load plugin
- allow-env: allow access to the env property
- unstable: required since the deno_mongo plugin is in unstable mode currently
If your code compiled successfully and all required modules downloaded, the terminal will show the Listening on port: 4000 message. If you face any compile errors, do not worry, they are nicely explained and you should be able to resolve the issues easily, especially in this simple scenario.
To test the route and the controller method I will use Postman and the result should be:

We can now move on to creating additional controller methods. Navigate back to the employeeCtrl.ts and add POST(addEmployee) and PUT(updateEmployee) actions:

These two methods of implementation should be understandable.
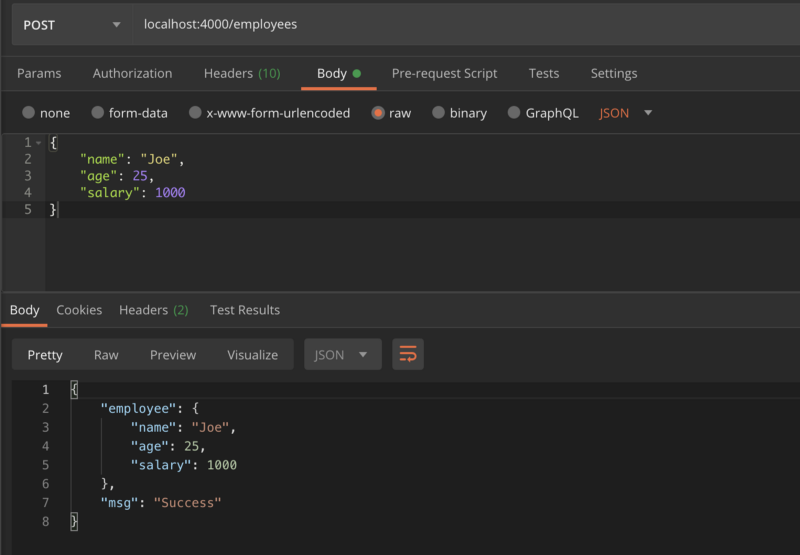
To add a new employee, we need to read the values from the request s body. Check if it contains all necessary properties (usually done by implementing a validation library but Deno currently does not provide any), and save the record in an appropriate collection.
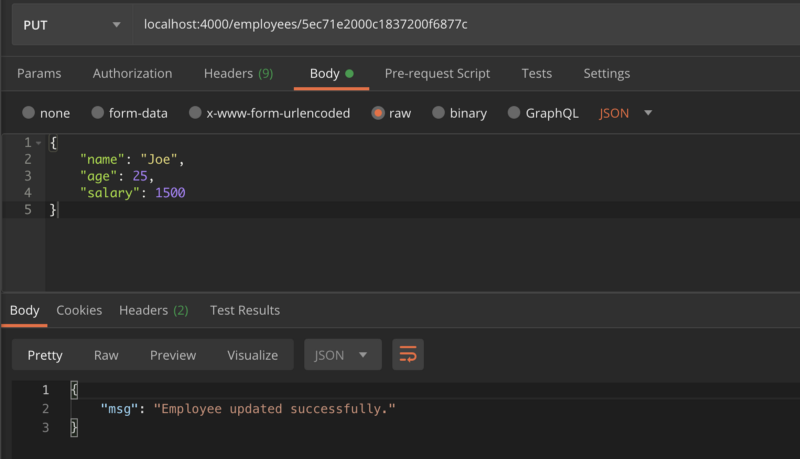
To update an existing employee, read the employee s id provided through the params, search its properties, and make the updates based on the request s body.
It is important to mention that we defined our updateEmployee s input parameters as any type.Currently, the Context’s request object does not recognize ‘params’ as its property and the code will not be able to compile. This issue is related to the current version of the Oak module but the documentation states that params, request, and response, are all derived from the Context object so we are good to proceed.
Hopefully, this will be resolved in the near future. To make these actions alive, we need to define their routes. Jump to the router.ts and add these two lines of code:

Now, if you rerun the app, you can test the new methods implementation:
To finish our CRUD, we need to add two more methods: getEmployeeById and deleteEmployee:
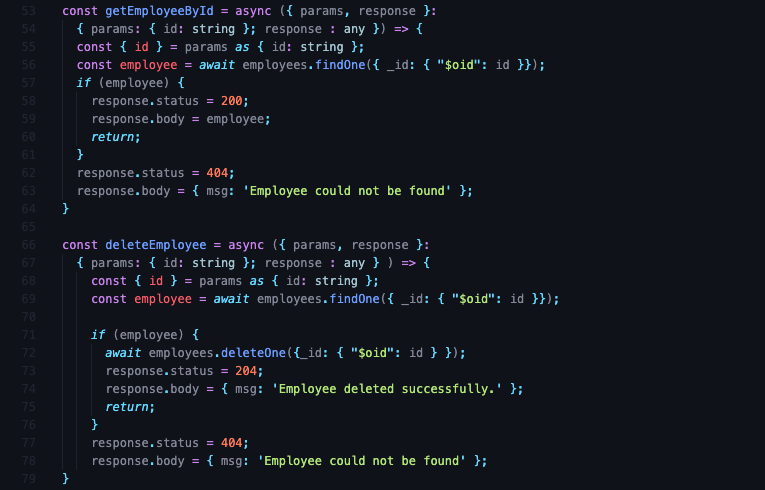
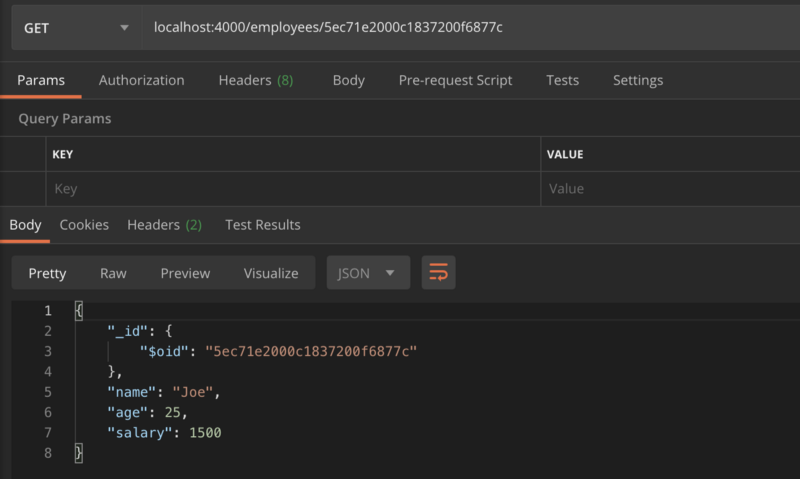
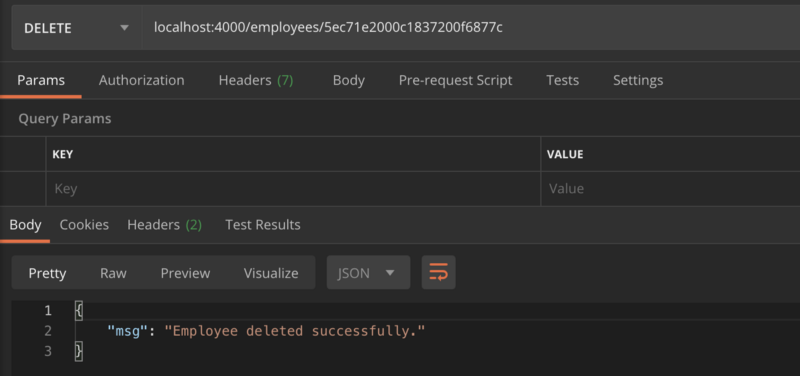
This method implementation is very similar to the previous one, except it contains different database actions for deleting and updating records. To wrap up our API, let s update our router and give a test to the new routes.

Now we have a simple API up and running. Comparing it with NodeJS, Deno s implementation seems very similar. It should only take some time to get familiar with different module imports, TypeScript, and permissions handling, which can be a real bottleneck in the beginning. Also, we need to take into consideration that there will be changes until Deno finds a stable setup.
JWT Authentication
Now I want to show you how you can use djwt, a third-party module, to generate auth tokens and protect your routes. We will make it as simple as possible by adding login method and login route to our existing controller and router. We will use the login method to generate a jwt token based on the username and password and set its expiration time to one hour. No username/password validation will be implemented since it is not the main focus of our topic.
We will start with employeeCtrl.ts by importing needed properties from the djwt module and generating token:
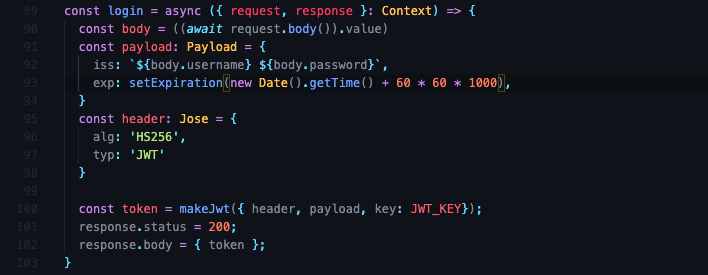
At the beginning of the file, we need to import makeJwt, setExpiration, Jose and Payload methods and properties of the djwt module. It is imported from “https://deno.land/x/djwt/create.ts”.
- Payload a payload type that accepts issuer and token expiration time as properties
- setExpiration() a helper method that sets the token s expiration type and accepts a number of Date type as input param, we set it to one hour
- Jose a header type with algorithm and token type properties. Currently, three types of algorithms are supported: HS256, HS512 and none for unsecured tokens
- makeJwt() a helper method that generates the token based on the header, payload and a key (JWT_KEY defined in the config.ts, use any generated string value)
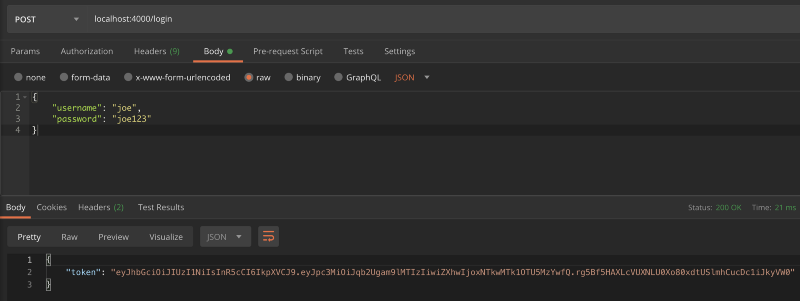
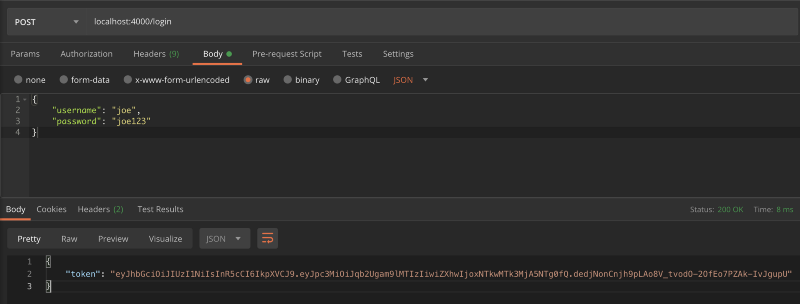
To be able to get the token, update your router by adding additional POST login path that will accept the username and password as body values:

Rerun your code and let s give it a try:
If you have successfully received the token, we can move on to creating an authMiddleware and adding it to protect our create, delete, and update routes:

Our middleware accepts two params: Context and next().
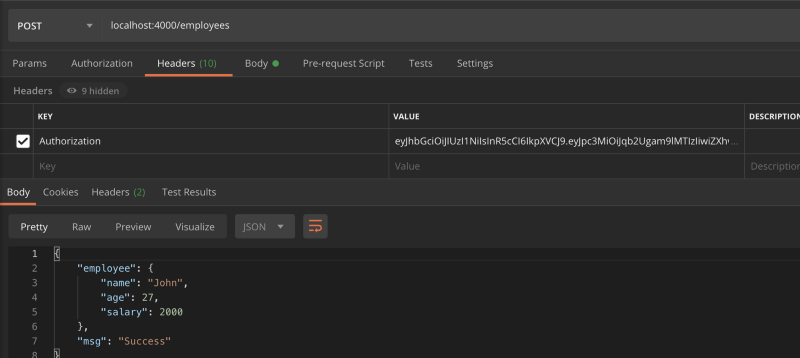
First, we need to read the Authorization header from our request. If it contains the value, we are calling djwt s imported method validateJwt that accepts the token and our JWT_KEY (the same one we used for generating the token).
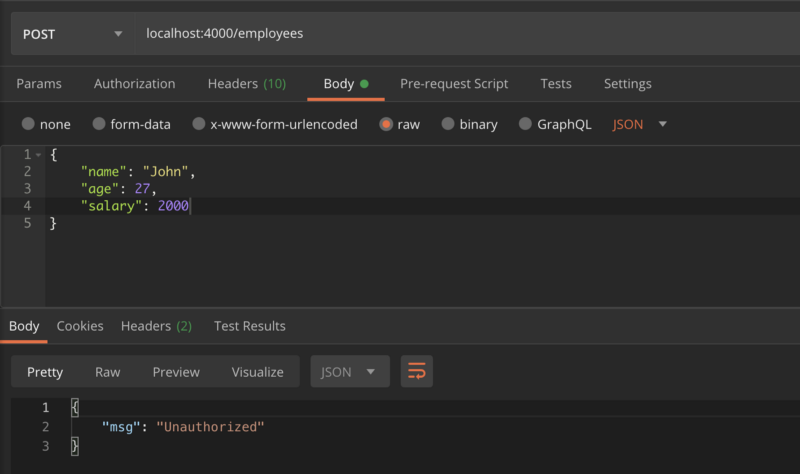
The isThrowing property is true by default, so we need to override it since we are handling invalid token our way. By default, it would throw an Error for invalid token. If token validation passes successfully we will call the next() command, which will automatically execute the next middleware set in our route. In our case, it will be one of the employee s controller methods. Otherwise, we will return the Unauthorized response.
The only thing left before testing our authentication middleware is to bind it onto our protected routes. The final version of the router should look like this:

We have now a basic protection for the POST, PUT and DELETE routes. In real case scenario, this authentication needs additional work around but we will leave that for some other time. The idea behinds it is just to understand the main principle of how you can use djwt module.
Error handler
Error handling can be tricky when writing JavaScript or Typescript. The most common way of error handling is using the try/catch blocks or writing the global error handler on the application level.
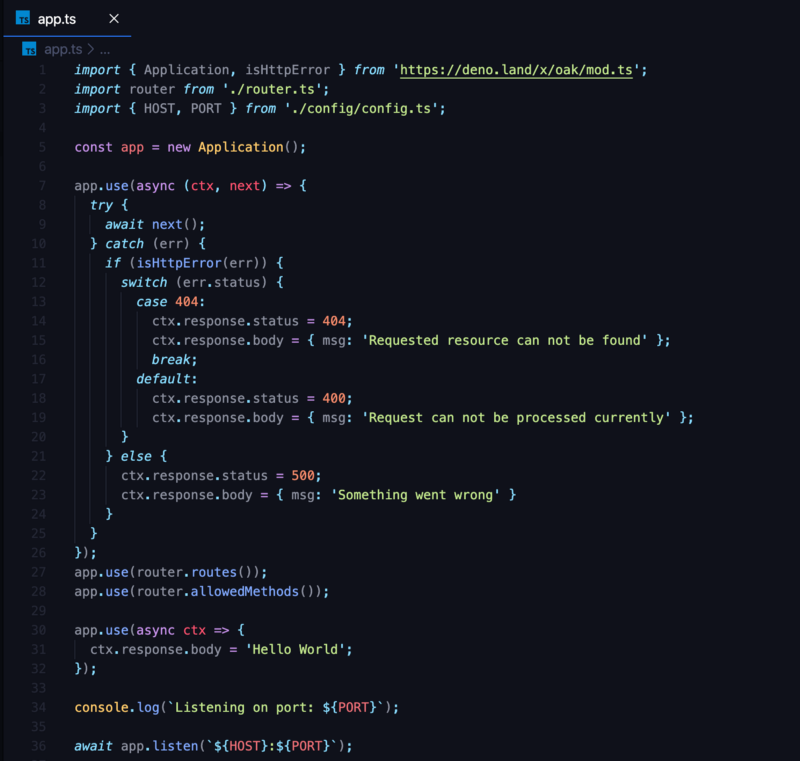
To avoid repetition of try/catch for all methods, we will define an error handler in our app.ts that will monitor each income request and track its execution. By default, if you add an optional parameter allowMethods on the Oak middleware, it will automatically return corresponding response for Method not allowed (405) and Not Implemented (501).
To set up our error handler, navigate to app.ts and update its content as follows:
Conclusion
I hope you got an overall picture of how to start working with Deno. I tried to make it as simple as possible and to cover some main aspects of creating basic and upgradeable API. As I mentioned before, Deno is very young and many things will be changing in the near future, but the core concept should remain the same.
People are usually asking will Deno kill Node. In my opinion, that will not happen. Node is a very popular and production stable platform with a great community and support. It will take a lot of time for Deno to reach that level, especially to make developers change their mind and discard Node. But to make it clear, Deno has a lot of pros and a bright future ahead. It should totally be on the must learn list for all JavaScript developers.
Until some next journey, stay safe and enjoy coding 🙂
GitHub repository link: https://github.com/harisbr/deno_api
looks like your djwt code is obsolete according to 2.3