Out with the old, in with the new, may you be happy the whole year through!
I hope you ve all had time to wind down and rest in the last couple of weeks.

I decided to open this year s blog season with Windows Subsystem for Linux.
Linux and Windows in the same sentence? Oh yes. And on top of that, I threw in a word subsystem. What a mix, right? Are we looking at something that will possibly help us merge the gap between the two different worlds?
Let s stop and rewind for a second here; back in the day, developers who have been using Microsoft tech stack used Windows as a dev environment, while folks who were more oriented towards an open-source world used Linux.
There was a clear line and the two never had anything in common until the appearance of the Windows Subsystem for Linux (WSL). However, if you were really, really interested in cross-OS functionalities and you really wanted to get the best out of both, you basically had two options:
- Configure your workstation to support dual-boot or
- Use some kind of virtual machine so you can run the second OS from the native one
So what is actually WSL?
Windows Subsystem for Linux is a compatibility layer for running Linux binary executables (in ELF format) natively on Windows 10 and Windows Server 2019.
The initial version was released nearly three years ago, on August 2, 2016, and it came with a Linux-compatible kernel interface developed by Microsoft. The interesting fact is that it didn t contain actual Linux kernel code, however, it still supported most of the native Linux commands.
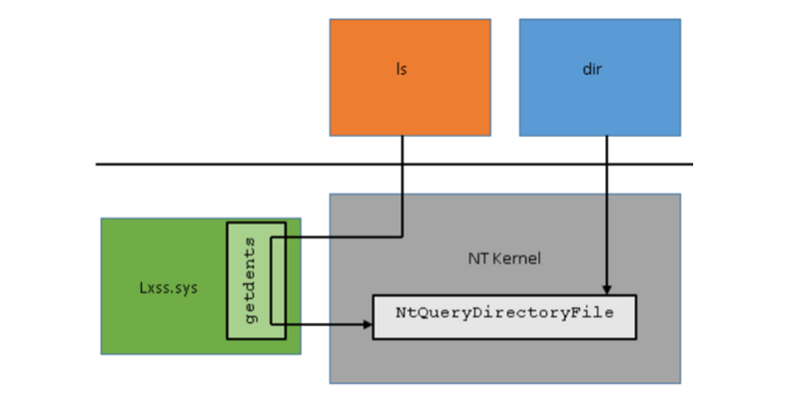
Where did the magic happen exactly, then?
Well, the Microsoft team has created a translation layer between user inputs and NT kernel. If a command is a native Windows command, it will be directly passed down to Windows kernel, which already knows how to handle it. If it s a Linux command, the translation service will be called and from that point, the request will be forwarded to the newly instantiated process where Linux instance is hosted (PICO process). Once the command is executed, the result is again translated to the appropriate command which NT kernel can understand:
For more information, you can check the official Microsoft blog.
Please note: although the focus of this blog will be on the first version of WSL, I want to let you know that WSL 2 was released 6 months ago (June 12, 2019). In the second version, the Linux kernel compatibility layer has been replaced by the real Linux! As a result, I/O performance has been improved significantly! For more details check the following link: WSL vs WSL 2 – performance.
Setting up WSL
The first thing you need to do is to enable the WSL feature:
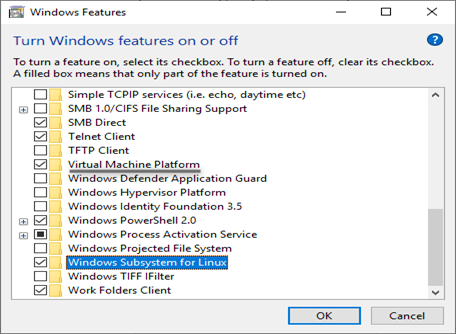
You can do this through the control panel or you can do it through Powershell since we ll be using Linux after all and you may want to warm up your fingers for some text-based commands 🙂
Enable-WindowsOptionalFeature -Online -FeatureName Microsoft-Windows-Subsystem-LinuxWSL 2 Requirements
- A computer that supports Hyper-V Virtualization
- Windows 10 Insider Preview Build 18917 or higher (you ll probably have to join Microsoft Windows Insider program in order to get the latest build)
- Make sure you enable the Virtual Machine Platform option as well.
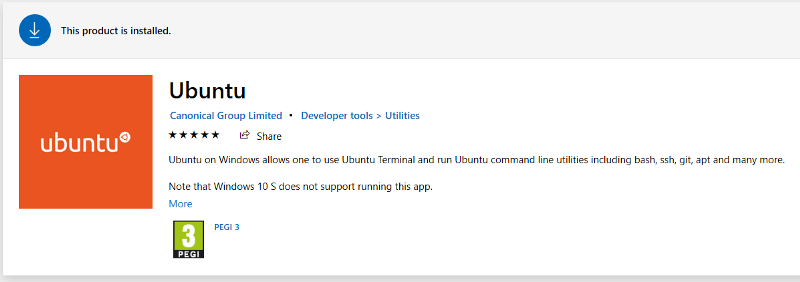
The next thing you need to do is to install the preferred Linux distribution from Microsoft Store. You can choose one of the free or paid versions:
The Pengwin is the first Linux® distribution optimized for WSL based on Debian from open-source software startup Whitewater Foundry (formerly WLinux).
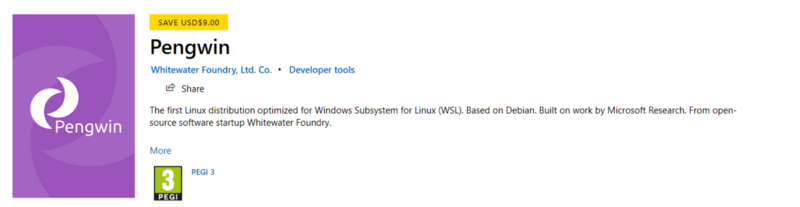
It s the distro that provides faster patching for WSL-specific bugs than any upstream Linux distro available on WSL. You can find more details on the official Github link.
Besides these two, you can choose any of the following distros:
- Ubuntu 16.04 LTS
- Ubuntu 18.04 LTS
- OpenSUSE Leap 15
- OpenSUSE Leap 42
- SUSE Linux Enterprise Server 12
- SUSE Linux Enterprise Server 15
- Kali Linux
- Debian GNU/Linux
- Fedora Remix for WSL
- Pengwin
- Pengwin Enterprise
- Alpine WSL
Once you have installed your Linux distribution, you can access WSL through:
Windows CMD
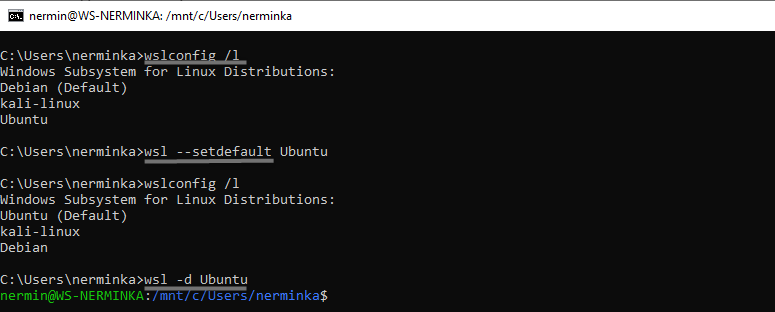
You can check which Linux distributions are installed, set up the default one and run it:
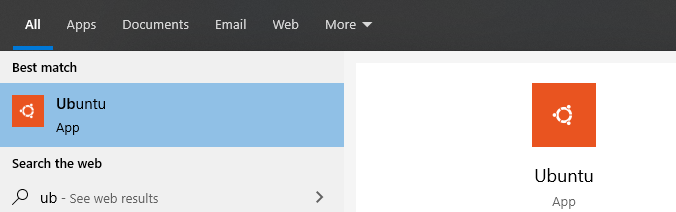
Windows Search
Just type the name of the distro you have installed:
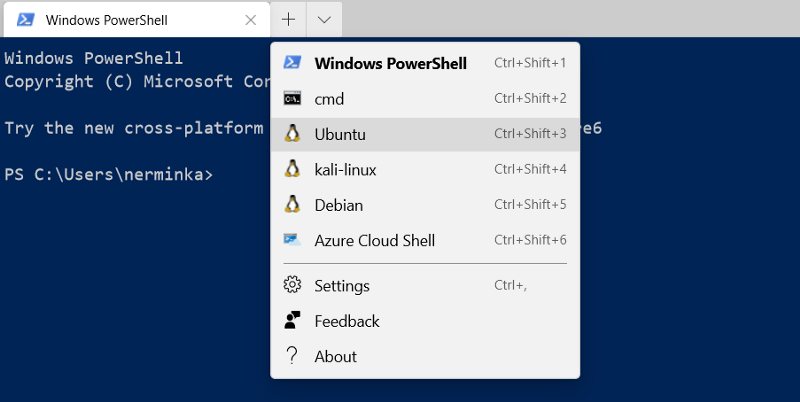
The new Windows Terminal
Or you can get the new Windows Terminal. It includes multiple tab support, it s fully customizable, supports GPU-based text rendering and even emojis. From the dropdown, just click the settings option and you ll be able to fully customize your new terminal:
The only difference you ll encounter in the second case is that your root folder will be located at the following path:
C:/Users/username/AppData/Local/Packages/CanonicalGroupLimited.UbuntuonWindows_79rhkp1fndgsc
instead of
C:/Users/username
Execute a few standard commands like pwd, dir, ls and you ll see the difference.
So far you could see that there are practically no boundaries between main OS and WSL when it comes to file-sharing. The same goes for using different dev tools.
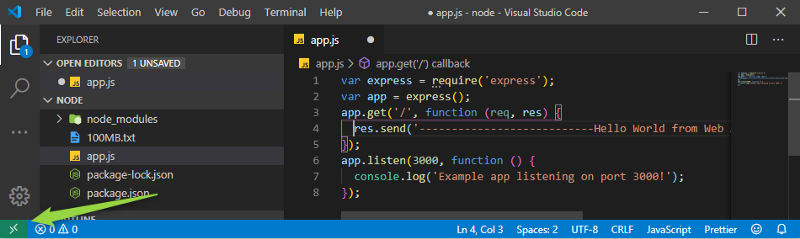
Let s create a simple hello-world Node.js app and open it in Visual Code:
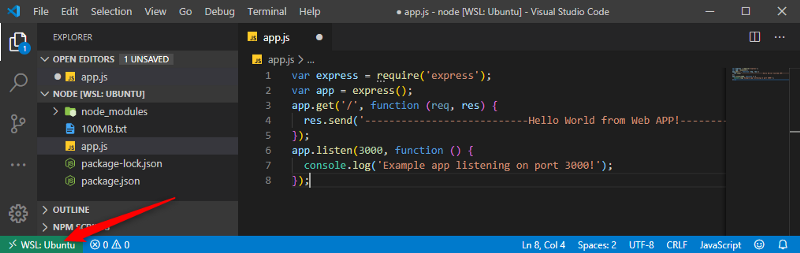
You can see that the app is running on Ubuntu! If you open it from Windows OS you ll notice the difference:
Also, if you try installing some extension you ll spot the difference again:
Now, let s run the app!

The same applies even when it comes to running your apps. In order to see that our app is up and running and also accessible from Windows, enter an address above in your browser:

Now let s try a few native Linux tools. First, let s measure app response time:
time wget localhost:3000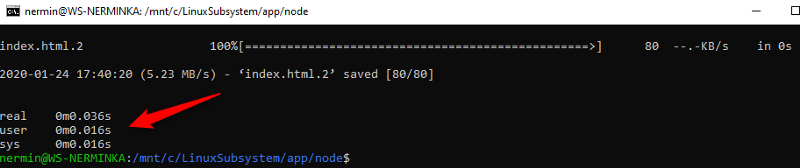
After this, change our controller to return the 100MB file as the response:

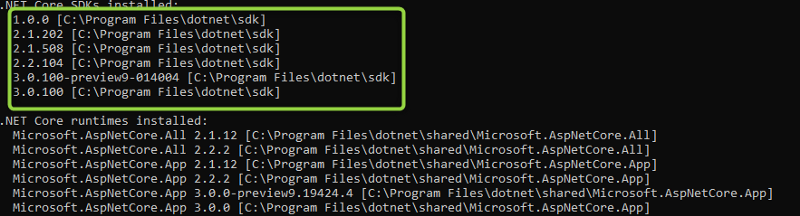
Let s take a look at one more example. This time we ll create a DotNet Core API. First thing is to install DotNet Core SDK. Once this is done we can check the installed version on both WSL and main OS with the following command:
dotnet --info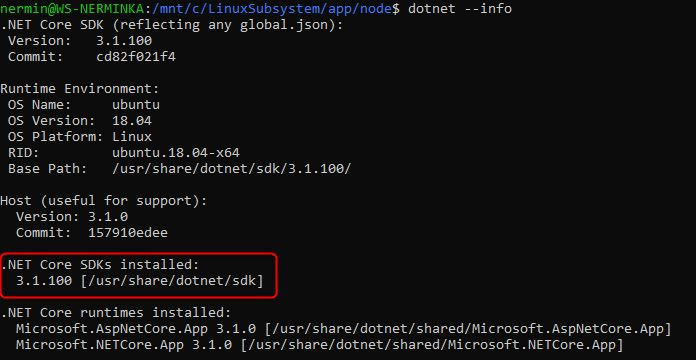
Next step is to create a simple Web API project using NetCore CLI on WSL:
dotnet new webapi -o ProjectNameTo make sure that our Web API is actually created on Linux and not on Windows, go to the project root folder and execute the following command:
cat projectname.csproj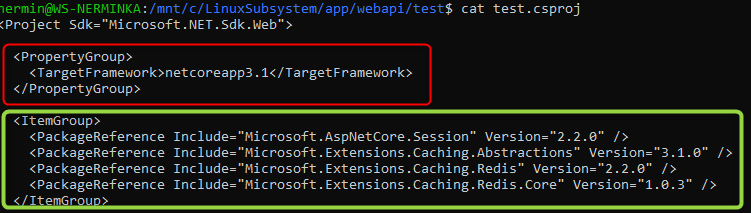
Here you can see that we use the right version of the framework. You will also notice that I have installed a few additional packages and guess what ?! We can test Redis caching as well!
Redis is an open-source (BSD licensed), in-memory data structure store, used as a database, cache and message broker and it natively runs on Linux OS.
Once we installed both Redis server and required packages we can run our app with the following command:
dotnet run
Now open the browser and you ll see that value is added to cache:

Check the cache from CLI:

Open URL again and you ll see that it s successfully being read from cache:

In conclusion
If you want to check all Linux programs that work (and those that don t) on the Windows subsystem for Linux you can find the whole list reviewed by its community on the following link.
I m a big fan of WSL because it is a really powerful tool that enables us to make the best out of both worlds. WSL allows us to take advantage of Linux and all perks that this OS brings while using Windows as the main development environment. WSL2 is even more powerful because it actually comes with the real Linux kernel. This means it performs faster and it will get updated more frequently.
Pro time-saving tip: If you encounter any error during your WSL testing, just google it so you can exclude the probability of WSL bugs.
That s it. I hope you find this short tutorial useful. If you have any comments or questions, feel free to write them down. Cheers!