
This will be a two-part guide for designing flexible and cross-platform API using ASP.NET Core.
Key takeaways
- ASP.NET Core is a cross-platform, high performance framework which can be used for building flexible Web API s.
- By following the explicit dependencies principle, ASP.Net core middleware provides clean and decoupled architecture.
- JWT token is compact and lightweight but powerful format which is used for secure transfer of information between API and end-users.
- Third party libraries can be used for creating a powerful data validation rules.
- Abstraction principles provide robust, extensible and testable solutions.
ASP.NET Core-quick recap
ASP.Net Core is an open-source, general-purpose development platform introduced by Microsoft on June 27, 2016. Since then it has been a long journey filled with constant innovations and improvements and the platform itself was widely accepted in the tech community. Today, ASP.NET Core stands for a robust web framework for building flexible, high performance, cross-platform solutions. I will not go over the details for every major release but I ll just mention that the latest 3.0 preview version was released a few days ago and again, it comes with a few new tricks in its sleeve. It s something that you definitely want to check out. Full release notes can be found at the official GitHub page.
Building a flexible API
When we talk about web-oriented software solutions, it s hard to think of one without at least some kind of API in the background. On the other hand, when talking about large-scale, enterprise software architecture, it s almost unimaginable. So without further delay, let s create a functional API by leveraging:
- Powerful and extensible ASP.NET Core middleware,
- ASP.NET Core integrated dependency injection support,
- Asynchronous programming paradigm,
- Versatile data contract validation power by FluentValidation library,
- Lightweight, yet compact and secure JWT based authentication,
- Abstraction layers using a generic repository.
High-level design overview
Before we look into the high-level design of our API, let s assume the following:
- API has exposed actions for Registration, Login, and actions for getting relevant data
- JWT based authentication is implemented
By having this in mind, the registered user will send authentication credentials to API, and if the user has been successfully authenticated, API will respond with JWT token. In order to access user data, every subsequent request needs to include JWT token.
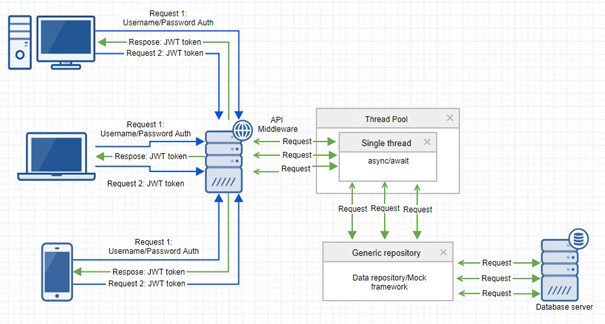
In order to increase the performance and responsiveness of API, we can use asynchronous programming concepts (async/await). This means while API wait s for I/O operation completion, processing thread will be returned to thread pool and it will be available for other requests. If this was a synchronous call, the thread would be busy waiting, without actually doing anything. In general, this will improve scalability by reducing thread usage. We ll also create a generic async repository in order to gain the same benefits in underlying data layers and also to make our code more flexible.
Prerequisites
We already explained the high-level design and now we ll cover the necessary tools. Although we could write an article for the usage of every single tool mentioned below, our goal is to create a functional API without too much hassle. In order to do this, we ll keep everything short and concise as much as possible.
Tools:
- Visual Studio Code – Combines the simplicity of a source code editor with powerful developer tooling, like IntelliSense code completion and debugging
- ASP.NET Core SDK – Software Development Kit (SDK) which contains a set of libraries and tools that allow developers to create ASP.NET Core applications and libraries. The latest stable version is: v2.2.104
- ASP.NET Core CLI – Powerful command line interface for building apps
- SQL lite database & DB Browser for SQLite – In-process library that implements a self-contained, serverless, zero-configuration, transactional SQL database engine
- Fluent Validation library – Validation library that uses a fluent interface and lambda expressions for building powerful and testable data validation rules
- Swagger – The platform for API design and documentation with OpenAPI
Create API
First, let s create a project using ASP.NET Core CLI
Command: dotnet new webapi -o WebApp.API n WebApp.API
With ASP.NET Core 2.1, the project templates have been updated to enable HTTPS by default. Also, 2.1 version adds support for HTTP Strict Transport Security (HSTS) to enforce HTTPS usage in production and adds improved support for redirecting HTTP traffic to HTTPS endpoints. We ll use Swagger for testing so we don t need any additional set up, but if you plan to use some other HTTP clients like Postman, you have a few options:
1. Generate self-signed certificate for development environment and import it in browser or any other HTTP client ex. Postman
2. Comment out following lines in Startup.cs
// app.UseHsts();
//app.UseHttpsRedirection();
If you are building a standalone API and you are not going to deal with redirects, URL parsing, routing, etc., so you can go with the second approach just for the sake of easier setup and testing.
After we execute dotnet watch runcommand, API should be accessible through following URL – http://localhost:5001/api/values.
Kestrel is a default web server for ASP.NET Core apps and it s listening on ports 5000/5001 (http/https).
Configure swagger
As we ve already mentioned, we ll use Swagger for testing, so let s configure it:
- Add Swashbuckle.AspNetCore package to the project
<PackageReference Include="Swashbuckle.AspNetCore" Version="4.0.1"/>Swashbuckle provides an embedded version of the swagger-UI that s powered by the generated Swagger JSON. This means that the API documentation is always in sync with the latest code. It requires minimal coding and maintenance and allows you to focus on building an API.
2. Add the Swagger generator to the services collection in the ConfigureServices method:
// Register the Swagger generator, defining 1 or more Swagger
   documents
services.AddSwaggerGen(c =>
{
    c.SwaggerDoc(“v1”, new Info { Title = “WebApp.API”, Version =
    “v1” });
});
3. In the Configure method, enable the middleware for serving the generated JSON document and the Swagger UI:
// Enable middleware to serve generated Swagger as a JSON endpoint.
app.UseSwagger();
// Enable middleware to serve swagger-ui (HTML, JS, CSS, etc.),
// specifying the Swagger JSON endpoint.
app.UseSwaggerUI(c =>
{
    c.SwaggerEndpoint("/swagger/v1/swagger.json", "My API V1");
});
Since we run our API with dotnet watch tool, compilation process will be executed every time code change occurs so now we can access Swagger UI at http://localhost:5001/swagger.
Let s test our GET, out of the box action:
Create a database
Now, let s start working on connecting API with database. We will use SQLite because it provides a lightweight disk-based database that doesn t require a separate server process. Later, we ll introduce generic repository and you ll be able to switch to MSSQL database, ASP.NET Core InMemory database for testing purpose etc.
- First, install required packages for SQLite database (Install using NugetPackage Manager)
<PackageReference Include="Microsoft.EntityFrameworkCore" Version="2.2.0"/>
<PackageReference Include="Microsoft.EntityFrameworkCore.Design" Version="2.2.0"/>
<PackageReference Include="Microsoft.EntityFrameworkCore.Sqlite" Version="2.2.0"/>
2. Add a connection string to app configuration file
{
    "ConnectionStrings":
   {
     "DefaultConnection": "Data Source= Data Source=WebApp.API.db"
   }
}
3. Initialize SQLite provider in Startup.cs class
// This method gets called by the runtime. Use this method to add services to the container.fsd
public void ConfigureServices(IServiceCollection services)
{
   services.AddDbContext<DataContext>(x => x.UseSqlite
   (Configuration.GetConnectionString("DefaultConnection")));
}
4. Create an interface for communication with database (DataContext) and entities that will be used:
namespace WebApp.API.Data
{
   public class DataContext : DbContext
   {
      public DataContext(DbContextOptions<DataContext> options) :
      base(options) { }
      public DbSet<User> Users { get; set; }
      public DbSet<Book> Books { get; set; }
   }
}
namespace WebApp.API.Models
{
   public class Book
   {
      public int Id { get; set; }
      public string Title { get; set; }
      public string Author { get; set; }
      public string Publisher { get; set; }
      public string Language { get; set; }
      public string SoldBy { get; set; }
      public string Description { get; set; }
    }
}
namespace WebApp.API.Models
{
   public class User
   {
      public int Id { get; set; }
      public string Username { get; set; }
      public string FirstName { get; set; }
      public string LastName { get; set; }
      public string Email { get; set; }
      public string Phone { get; set; }
      public string Country { get; set; }
      public string City { get; set; }
      public string PostalCode { get; set; }
      public bool   IsActive { get; set; }
      public byte[] PasswordHash { get; set; }
      public byte[] PasswordSalt { get; set; }
    }
}
5. Create initial database migration
Command: dotnet ef migrations add InitialCreate
6. Create database
Command: dotnet ef database update
After all commands have been successfully executed, WebApp.API.db file will appear in the project root level. Now we can inspect database and modify data using DB browser for SQLite tool.
Repositories
We ll use repository pattern together with asynchronous programming concepts in order to improve application performance and enhance the responsiveness of our API. The repository pattern is one of the most used patterns because it provides us with a nice abstraction when working with data.
Generic repository
Before we start working on it, I would like to point out that the generic repository pattern has its own advantages and disadvantages, especially when we talk about repository on the top of some ORMs (in our case entity framework). Entity framework already internally implements repository pattern and unit of work pattern so you ll find a lot of discussions on this topic.
In my humble opinion, I find it still useful because of the following reasons:
- It provides us with centralized data access logic.
- You can expand repositories with some additional features using decorator patterns.
- Sometimes you don t want to expose all entities and methods through Context class etc.
There is a lot of different ways to implement it, but as I said, you ll have to find what is most suitable for your needs.
Let s create it:
public interface IGenericRepository<T>
{
   Task<IEnumerable<T>> FindAllAsync();
   Task<IEnumerable<T>> FindByConditionAync(Expression<Func<T,
   bool>> expression);
   void Update(T entity);
   void Delete(T entity);
   Task SaveAsync();
}
public interface IBookRepository
{
   Task<IEnumerable<Book>> GetAllAsync();
   Task<Book> GetByIdAsync(int id);
   Task CreateAsync(Book value);
   Task UpdateAsync(Book value);
   Task DeleteAsync(int value);
}
public abstract class GenericRepository<T> : IGenericRepository<T> where T : class
{
   protected DataContext context { get; set; }
   public GenericRepository(DataContext context)
   {
       this.context = context;
   }
   public async Task<IEnumerable<T>> FindAllAsync()
   {
      return await this.context.Set<T>().ToListAsync();
   }
   public async Task<IEnumerable<T>>
   FindByConditionAync(Expression<Func<T, bool>> expression)
   {
     return await
     this.context.Set<T().Where(expression).ToListAsync();
   }
   public void Create(T entity)
   {
      this.context.Set<T>().Add(entity);
   }
   public void Update(T entity)
   {
      this.context.Set<T>().Update(entity);
   }
   public void Delete(T entity)
   {
      this.context.Set<T>().Remove(entity);
   }
   public async Task SaveAsync()
   {
      await this.context.SaveChangesAsync();
   }
}
Concrete implementation for Book entity:
public class BooksRepository : GenericRepository<Book>, IBookRepository
{
    public BooksRepository(DataContext context) : base(context) { }

    public async Task<IEnumerable<Book>> GetAllAsync()
    {
       return await FindAllAsync();
    }
    public async Task<Book> GetByIdAsync(int id)
    {
       var books = await FindByConditionAync(o => o.Id == id);
       if (books == null)
           return null;
       // Search by Id will always return one record
       return books.SingleOrDefault();
    }
    public async Task UpdateAsync(Book book)
    {
       Update(book);
       await SaveAsync();
    }
    public async Task DeleteAsync(int id)
    {
       var book = await this.GetByIdAsync(id);
       Delete(book);
       await SaveAsync();
    }
    public async Task CreateAsync(Book book)
    {
       Create(book);
       await SaveAsync();
    }
}
The main advantage of CRUD generic repository is that you can inherit from it, pass it an entity type and you have a repository for that entity. Simple as that.
Authentification repository
For authentication repository we ll go with a slightly simpler approach. We ll create an interface and concrete implementation of our repository:
public interface IAuthentificationRepository
{
    Task<User> RegisterAsync(User user, string password);
    Task<User> LoginAsync(string username, string password);
    Task<bool> UserExistsAsync(string username);
}
public class AuthRepository : IAuthentificationRepository
{
   private readonly DataContext _dbContext;
╦ø  public AuthRepository(DataContext dbContext)
   {
      _dbContext = dbContext;
   }
   public async Task<User> RegisterAsync(User user, string password)
   {
      byte[] passwordHash;
      byte[] passwordSalt;
      _CreatePasswordHash(password, out passwordHash, out
      passwordSalt);
      user.PasswordHash = passwordHash;
      user.PasswordSalt = passwordSalt;
      await _dbContext.Users.AddAsync(user);
      await _dbContext.SaveChangesAsync();
      return user;
   }
   public async Task<User> LoginAsync(string username, string
    password)
    {
       var user = await _dbContext.Users.FirstOrDefaultAsync
       (x => x.Username == username);
        if (user == null)
           return null;
        if (!_VerifyPasswordHash(password,
           user.PasswordHash,user.PasswordSalt))
          return null;
        return user;
    }
    public async Task<bool> _UserExistsAsync(string username)
    {
       if (await _dbContext.Users.AnyAsync(x => x.Username ==
           username))
           return true;
       return false;
    }
    private void _CreatePasswordHash(string password,
    out byte[] passwordHash, out byte[] passwordSalt)
    {
       using (var hmac = new HMACSHA512())
       {
          passwordSalt = hmac.Key;
          passwordHash = hmac.ComputeHash
                  (System.Text.Encoding.UTF8.GetBytes(password));
       }
    }
    private bool _VerifyPasswordHash(string password,
    byte[] passwordHash, byte[] passwordSalt)
    {
       using (var hmac = new HMACSHA512(passwordSalt))
       {
          var computedHash = hmac.ComputeHash
              (System.Text.Encoding.UTF8.GetBytes(password));
          return computedHash.SequenceEqual(passwordHash);
       }
    }
}
In this example, we used HMACSHA512 algorithm for authentication. Basically, if the original and computed hash values match, the request is authenticated. If they do not match, either the data or the hash value has been changed.
HMACs provide security against tampering because knowledge of the secret key is required to change the message and reproduce the correct hash value.
API Controllers
Generate JWT tokens
This how we can generate JWT tokens for registered users:
[HttpPost("login")]
public async Task<IActionResult> Login(UserLoginDto user)
{
   user.Username = user.Username.ToLower();
   var existingUser = await _repository.LoginAsync(user.Username,
                                                   user.Password);
   if(existingUser == null)
     return Unauthorized();
   var claims = new[]
   {
      new Claim(JwtRegisteredClaimNames.Jti,
                Guid.NewGuid().ToString()),
      new Claim(ClaimTypes.NameIdentifier,
                existingUser.Id.ToString()),
      new Claim(ClaimTypes.Name, existingUser.Username)
   };
   var tokenSecretKey = Encoding.UTF8.GetBytes(
                     _config.GetSection("AppSettings:Token").Value);
   var key = new SymmetricSecurityKey(tokenSecretKey);
   var creadentials = new SigningCredentials(key,
                      SecurityAlgorithms.HmacSha512Signature);
   var tokenExpirationDays = Convert.ToInt32(
       _config.GetSection("AppSettings:TokenExpirationDays").Value);
   var tokenDescriptor = new SecurityTokenDescriptor
   {
      Subject = new ClaimsIdentity(claims),
      Expires = DateTime.Now.AddDays(tokenExpirationDays),
      SigningCredentials = creadentials
   };
   var tokenHandler = new JwtSecurityTokenHandler();
   var token = tokenHandler.CreateToken(tokenDescriptor);
   return Ok(new { token = tokenHandler.WriteToken(token) });
}
First, we check if the user exists, then we create claims, and afterwards, we generate symmetric security key based on JWT token secret key. Finally, we create a JWT token. Code is pretty much self-explanatory, so I ll just point out a few more details regarding used claims:
- The “JTI” (JWT ID) claim provides a unique identifier for the JWT and it can be used to prevent the JWT from being replayed
- We usually populate NameIdentifier claim with entity id. In our case, it s user id
- Name claim is the unique name of the user. We usually populate it with username
More information regarding JWT tokens and claims can be found in official JWT RFC7519 standards document.
Wire up controllers with repository
Below is an example of an API controller with CRUD operations for Book entity:
[Route("api/[controller]")]
[ApiController]
[Authorize]
public class BooksController : ControllerBase
{
   private readonly IBookRepository _repository;
   public IMapper _mapper;
   public BooksController(IBookRepository repository, IMapper
   mapper)
   {
      _mapper = mapper;
      _repository = repository;
   }
   // GET api/values
   [HttpGet]
   public async Task<IActionResult> GetValues()
   {
      var books = await _repository.GetAllAsync();
      return Ok(books);
   }
   // GET api/books/5
   [HttpGet("{id}")]
   public async Task<IActionResult> Get(int id)
   {
      var book = await _repository.GetByIdAsync(id);
      if (book == null)
          return NotFound();
      return Ok(book);
   }
   // POST api/books
   [HttpPost]
   public async Task<IActionResult> Post(AddBookDto book)
   {
      var bookToAdd = _mapper.Map<Book>(book);
      await _repository.CreateAsync(bookToAdd);
      return StatusCode(201);
   }
   // PUT api/books/5
   [HttpPut("{id}")]
   public async Task<IActionResult> Put(int id, UpdateBookDto book)
   {
      var bookToUpdate = _mapper.Map<Book>(book);
      bookToUpdate.Id = id;

      await _repository.UpdateAsync(bookToUpdate);
      return Ok();
   }
    // DELETE api/books/5
    [HttpDelete("{id}")]
    public async Task<IActionResult> Delete(int id)
    {
       await _repository.DeleteAsync(id);
       return Ok();
    }
}
We are using dependency injection to inject repository in controllers. Also, if you take a close look at our controller, you ll see [Authorize] attribute above. Well, you can get an idea of what we are trying to accomplish here. Users will have to pass a valid JWT token in order to pass authentication and to access books resources.
Set up FluentValidation and AutoMapper
After we implemented authentication and created repositories and controllers, let s wrap everything up with dto s, automapper and fluent validation.
Example of DTO for register user entity:
public class UserRegisterDto
{
    public string Username { get; set; }
    public string Password { get; set; }
    public string FirstName { get; set; }
    public string LastName { get; set; }
    public string Email { get; set; }
    public string Phone { get; set; }
    public string Country { get; set; }
    public string City { get; set; }
    public string PostalCode { get; set; }
}
In order to avoid manual copying of properties between DTO s and database models, we ll use automapper.
AutoMapper configuration:
public class AutoMapperProfiles : Profile
{
   public AutoMapperProfiles()
   {
       //User mappings
       CreateMap<UserLoginDto, User>();
       CreateMap<UserRegisterDto, User>();
       //Book mapping
       CreateMap<AddBookDto, Book>();
       CreateMap<UpdateBookDto, Book>();
    }
}
Furthermore, for DTO s validation we ll use FluentValidation library. It s a small library for ASP.NET/Core that is based on fluent interface and lambda expressions. It has great features, such as:
- Predicate validators
- Custom message placeholders
- Custom validator
- Reusable property validators etc
The library is regularly updated at GitHub and it s also available as a Nuget package, so it s easy to add it to any application. Just keep in mind that current version does not support latest ASP.NET Core preview version.
An example of simple validation by leveraging lambda expressions is shown below:
public class AddUserDtoValidator :AbstractValidator<UserRegisterDto>
{
   public AddUserDtoValidator()
   {
      // Username
      RuleFor(x => x.Username)
                    .NotNull()
                    .WithMessage("Username must be provided");
      RuleFor(x => x.Username)
                    .NotEmpty()
                    .WithMessage("Username is empty");
      RuleFor(x => x.Username).Length(0, 8)
      .WithMessage("Username must contain at least 8 characters");
      // Firstname
      RuleFor(x => x.FirstName)
                   .NotNull()
                   .WithMessage("FirstName must be provided");

      RuleFor(x => x.FirstName)
                   .NotEmpty()
                   .WithMessage("FirstName is empty");
     // Lastname
     RuleFor(x => x.LastName)
                   .NotNull()
                   .WithMessage("LastName must be provided");
     RuleFor(x => x.LastName)
                   .NotEmpty()
                   .WithMessage("LastName is empty");
     // Password
     RuleFor(x => x.Password)
                   .NotNull()
                   .WithMessage("Password must be provided");

     RuleFor(x => x.Password)
                   .NotEmpty()
                   .WithMessage("Password is empty");

     RuleFor(x => x.Password)
                   .Length(0, 12)
                   .WithMessage("Password must contain between 8
                                 and 12 characters");
     // Country
     RuleFor(x => x.Country)
                   .NotNull()
                   .WithMessage("Country must be provided");
     RuleFor(x => x.Country)
                   .NotEmpty()
                   .WithMessage("Country is empty");
     // Postal code
     RuleFor(x => x.PostalCode)
                   .NotEmpty()
                   .When(customer =>
                   !string.IsNullOrEmpty(customer.City));
   }
}
You can basically chain as many validators as you want and create a pretty complex validations. This is especially useful when you want to validate a property value based on other properties values (conditional validations).
In our example, “if city is not empty, then postal code must be provided“.
Another advantage is that it separates validation from viewmodels and also it supports named rules (different sets of rules can be created and applied for different scenarios).
That was it for Part 1. In the next blog, we ll explain how to configure API middleware and other services. In case you have any questions or thoughts so far, please feel free to comment below.
can you please send the git link….i need this code